gas coming out of spark plug hole on lawn mower
Eugene has a keen interest in DIY and gardening. Over a 30 year period he has also become self taught in garden power tool maintenance.
Help! My Lawn Mower Won't Start After Winter
It's summer again, you drag the mower out of storage and of course it refuses to start up. Or it starts once, then refuses to start again. TYPICAL!
In this article, you'll find a ten-point checklist to get your mower started. If that doesn't work, you'll learn more in-depth information about fuel, oil, and ignition system problems, carburetor fault-finding, checking for bad compression, and other issues which could be preventing the engine from starting.
Note that this second part of a two-part guide covers more advanced troubleshooting on four-stroke gasoline (petrol) engines. It might be a good idea to check out part one first, which is a 10-point quick troubleshooting checklist:
My Lawn Mower Won't Start? 10 Top Troubleshooting Tips for Small Engines
Four-Stroke Engines Used on Other Equipment
This troubleshooting guide applies to gasoline lawn mower engines, but it's equally valid for small four-stroke engines used on yard equipment such as portable generators, air compressors, welders, pumps, cultivators (e.g. rotary tillers, commonly referred to by the brand names "Rototiller" and "Rotavator"), snow blowers, compactors (wackers), cement mixers, etc.
Two-Stroke Engine Troubleshooting
If you've stumbled upon this page and need info on how to get a 2-stroke engine working (fitted to hedge trimmers, string trimmers/weed eaters, chainsaws, leaf blowers, small generators, and some lawn mowers), checkout my troubleshooting guide: String Trimmer Won't Work: 2-Stroke Engine and Carburetor Troubleshooting.
How Does a Lawn Mower Work?
A lawn mower engine is quite simple and basic compared to the one fitted to your car, although the principle of operation is the same. Generally, these type of engines are single cylinder and four-stroke (four cycle) and run on gasoline or "gas", which is known as petrol outside of North America. It's formal name is "motor spirit".
"Four Stroke" means there are four distinct phases or cycles which these engines go through before the process is repeated:
First, fuel flows from the tank to a device called a carburetor (often shortened to carb in the USA or carby in Australia) which mixes a fine mist of gasoline with air to form an explosive mixture.
- 1st stroke (Intake): Intake valve opens and mixture is sucked into a hollow cylinder in the engine block.
- 2nd stroke (Compression): Intake valve closes and mixture is compressed.
- 3rd stroke (Power): Mixture is ignited by a spark and burned to generate power. The rapid increase in temperature and pressure forces a piston down the cylinder, and this rotates a crankshaft to turn the blade.
- 4th stroke (Exhaust): Exhaust valve opens and burnt gases are expelled from the cylinder.
The complete four-stroke process is repeated about twenty times per second when the engine is running full throttle. The piston of the engine is connected to a crankshaft via a connecting rod. A sharpened blade bolted to the end of the crankshaft spins at about 3000 RPM, cutting the grass.
4 stroke engine cycle. The reciprocating (up and down) motion of the piston is converted to rotation using a connecting rod and crankshaft. In the case of a lawn mower, a grass cutting blade is attached to the end of the crankshaft.
Zephyris, CC SA 3.0 via Wikimedia Commons
What Are the Main Causes of Engine Starting Problems?
For an engine to start, it basically requires two things: fuel and a spark. If you aren't getting a spark at the plug or fuel isn't getting through to the engine (known as fuel starvation), the machine will never turn over. After storage during winter, seals, pumps and valves in the carburetor could have become gummed up with varnish deposits if you left fuel in the tank. During the summer, dust and dirt can block the fuel system or clog filters.
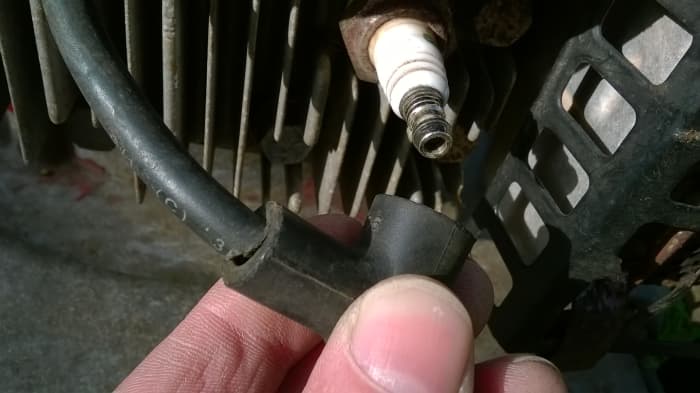
If you're trying to start the engine, check the spark connection. But if you need to clean under the deck or turn the blade, then remove the spark plug first.
© Eugene Brennan
Safety First: Before Working on Your Lawn Mower
- Important: When working on a mower, remember that gasoline/petrol is flammable. Remove all sources of ignition, such as naked flames, stoves, sparks, cigarettes, or any other hot objects in the vicinity when working on the tank or fuel lines. Also, adequate ventilation will prevent the build up of vapor. Don't leave rags moistened with gas lying about either as they could possibly ignite.
- Remove the spark plug or disconnect the lead. Before working on the underside of an engine, make sure the controls are all off, that the spark plug lead is disconnected, and that the engine has cooled down (if you were previously able to get it started). If you are going to start turning the blade, remove the plug from the engine for absolute safety. In theory, it's possible, even if the plug lead is disconnected and the cylinder of a hot engine is flooded with gas, that the resultant vapor could explode when compressed by the piston, just like in a diesel engine, as the blade is turned during removal or while cleaning the underside of the deck. Although the engine won't run, it could give a "kick" while spinning the blade. This would be enough to chop off fingers or even a whole hand! Maybe it's a remote possibility, but removing the plug will vent the cylinder and prevent this from happening.
- Check the manual to determine how your mower should be tipped for deck cleaning, oil changes or blade removal. Sometimes manufacturers recommend keeping the carburetor upwards, pointing skywards. Alternatively the plug may need to be uppermost with the handles tipped back onto the ground (you'll need a heavy weight such as a concrete block to keep the mower in this position). Don't turn the mower so that the carburetor and air filter face downwards as engine oil can foul the carb and filter, leading to difficulty in starting.
- Drain the tank if you estimate the fuel level will reach the cap. The cap has a vent and fuel can trickle out through this.
- Turn off the fuel tap if fitted. Then run the engine until it cuts out if the mower needs to be placed on its side or plug side up. The float bowl on some engines has an overflow and fuel can trickle out this vent. Also the float may not operate properly when the engine isn't horizontal, causing the carburetor to overflow into the intake manifold of the engine. If fuel leaks onto the outside of a hot engine, it can potentially start a fire. If the mower only needs to be raised a little to unclog the deck, you don't need to turn turn off fuel or drain the tank, but always disconnect the plug lead.
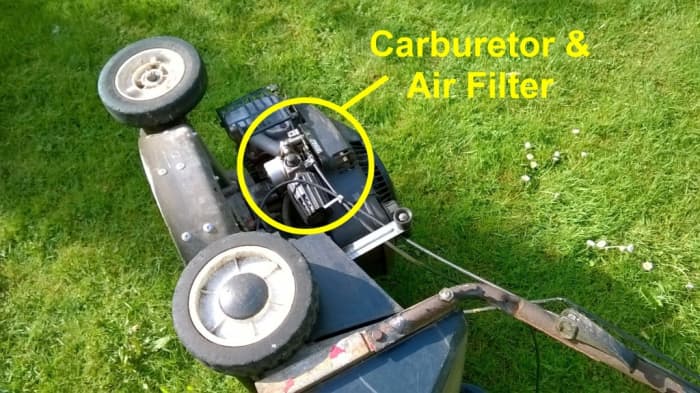
Some manufacturers recommend placing the mower on its side. The breather is usually on this side, so keeping it upright prevents oil from leaking out and fouling the carb or air cleaner
© Eugene Brennan

Alternatively lower the mower back onto its handles. A weight such as a block will keep it in place.
© Eugene Brennan
How Do You Start a Lawn Mower? Proper Startup Procedure
- Fill the gas tank using a funnel to avoid spilling gas over the engine (spilled gas could ignite if the engine is hot, so ideally wait until it cools!).
- Check the oil level as described below.
- Use new fuel. Old fuel can make starting difficult, especially fuel containing ethanol which attracts moisture, potentially causing corrosion. As fuel evaporates, it may leave a deposit of gum, gel, or varnish which can clog or stick moving parts together. Use a fuel stabilization product such as STA-BIL to keep fuel fresh during storage. Once you get the mower running, you can add the old fuel to the fuel in the tank, a little at a time over the season to use it up.
- The throttle control should be set to the full revs position. Engines have a device called a choke (basically a plate which acts as a blockage in the air intake) which makes the fuel vapor sucked into the engine "richer" or more concentrated, and this aids starting. On some mowers, the choke is completely automatic and turns off when the engine runs for a few seconds. On other mowers, the throttle needs to be set to an initial start/choke position which turns on the choke mechanism. Once the engine starts, the throttle control is pushed back to the run setting. A third scenario is that the choke is completely manual and must be turned on. There is usually a small lever for doing this which must be slid into position. This is often the case with portable generators. If there is a separate choke, turn it on when starting a cold engine and turn it off after the engine has been running for about 5 seconds. Don't use the choke if the engine has been running in the last 10 minutes or so.
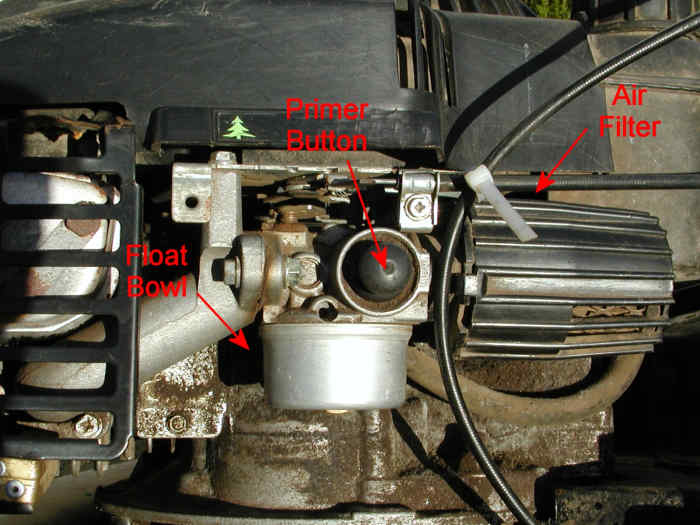
- If the engine has a primer button, press it in and release it about 5 times in total. The primer is a small pump (like the pump action on a bottle of window cleaner) whose function is to suck fuel up into the carburetor from the float bowl or tank. This allows easier starting, without requiring multiple pulls of the starter cord to suck fuel up into the carburetor.
- Pull the starter rope out until you feel resistance. Allow it to return gently and then pull the cord out sharply. This should be repeated until the engine starts but not more than about 4 times.
- If the engine hasn't started at this stage, push the priming button another few times and try to start the engine again by pulling the cord several times. If it doesn't start, it may have flooded so leave it for a while for fuel to evaporate.
- Once the engine has started and has been running for a few seconds, turn off the choke (if it is a manual control), or switch the throttle from the start to run position (if there is a start position on the throttle as described above).
Read More From Dengarden
How to Check the Oil Level in a Lawn Mower
Lawn mower engines are generally 4-stroke although 2-stroke engines are available. A 4-stroke engine has a crankcase or sump located at the lowest point of the engine. Oil in this reservoir is thrown onto the cylinder walls, crankshaft, and all other moving parts by a splasher or "flicker." The oil level in an engine should be checked before use. If the level is too low, or there is no oil in the engine whatsoever, it will rapidly seize up.
- Ensure the engine is cold or allow about 5 minutes for oil to settle if the engine has been running.
- Position the mower on a level surface.
- Remove the dipstick—this is usually attached to a small screw cap, smaller than the one on the gas tank.
- Wipe the stick clean with a cloth. Note the high and low level marks.
- Replace the dipstick.
- Now remove the dipstick again and check the level is between the marks.
Get into the habit of checking oil level regularly. Ideally this should be done every time you use the mower, but if the engine isn't burning oil, a check every month or so is sufficient (depending on usage). If you are cutting on sloped ground, oil consumption can be greater if oil gets blown through a vent/baffle arrangement for the crankcase called the breather. Actually it's no harm keeping the carburetor on the high side when mowing on a slope.
Lawn mowers should have an oil change after every 20 to 50 hours of use (consult your manual or look for info on the engine block for details). If you don't know how to do this, check out my guide How to Change Lawn Mower Oil.
If you buy a new mower or engine, the oil sump will usually be empty. Manufacturers drain oil out after testing and before shipping so that it doesn't leak if crates/boxes get turned upside down. Don't forget to add oil before use! Usually there's a label to remind you to do this before starting!
Checking Lawn Mower Oil
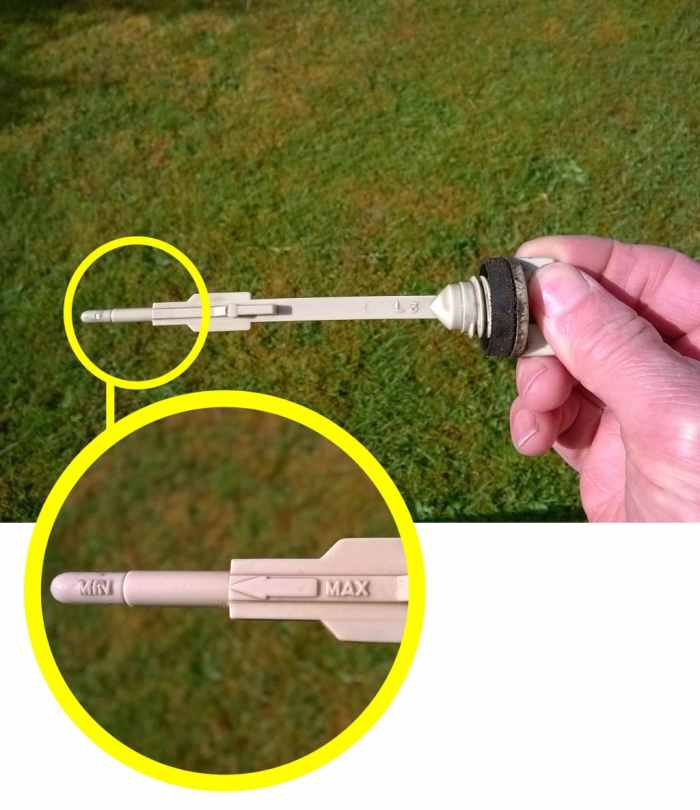
Oil level should be between the high and low marks on the dipstick.
© Eugene Brennan
Reasons and Solutions for a Lawn Mower That Won't Start
| Reason Your Mower Won't Start | Possible Solutions |
|---|---|
| Engine is not getting the fuel it needs. | Empty and refill tank with fresh gas; Check the fuel intake system: the carburetor bowl; the choke, throttle, primer button, fuel filter |
| It's not getting the spark it needs. | Clean the spark plug, check its connections, or replace it; check the ignition system. |
| It needs oil. | Check oil level. Some newer engines have a low oil level float switch to disable starting |
| It's not getting the air it needs. | Check, clean, or replace the air filter. |
| Starter rope issues. | Check flywheel brake; make sure there's nothing jamming the blade. |
| You put diesel into the engine instead of gasoline | Have you really used gasoline? You can tell by smell whether fuel is diesel, kerosene or gas. Ask someone who can tell the difference. |
| You ran over something that got tangled in the blade | The key in the flywheel may have sheared or the key in the blade carrier. Alternatively the blade carrier's internal surface may have been damaged by the key, requiring replacement. |
| Battery is flat or not charging | Ride on mowers and some of the newer walk behind self-propelled mowers have batteries for easy starting. Battery voltage should be at least 12 volts and over 13 volts when the mower is running and the battery is charging. |
| Carburetor has flooded | If you keep pulling gthe starter cord multiple times without the engine starting, the carburetor can flood with fuel, making starting even more difficult. Wait for 10 minutes for fuel to evaporate and try again. |
| Other. | Below, you'll find lots more possible causes and solutions. |
How to Get Your Mower Started: Initial Troubleshooting Checklist
| Tip |
|---|
| #1 Use fresh gas. Don't use old gasoline which can cause difficulty starting. Make sure there is enough fuel in the tank and check to make sure the vent in the tank cap is unblocked. |
| #2 Make sure the spark lead is firmly attached to the plug, and the plug is tightly screwed in. Try replacing the spark plug with a new one. |
| #3 Make sure the "dead man's handle" control on the mower is held fully against the mower handle while starting. |
| #4 Turn on choke if there's a manual choke fitted. Don't turn on the choke if the engine has been running in the last 5 minutes. |
| #5 Make sure the primer bulb is pressed about 5 times (if fitted). If the mower runs out of gas during cutting, it will need to be primed again. |
| #6 Check that the air filter isn't dirty. Wash and dry a foam type air filter (see below for details), or replace a dirty paper filter. |
| #7 Check the cable connecting the "dead man's handle" (on the frame) to the engine is not damaged or snapped. |
| #8 Check that the carburetor is tightly screwed or bolted to the engine. |
| #9 Make sure there is no water lodged at the bottom of the gas tank. |
| #10 If the starter cord is hard to pull, check that there are no clumps of grass clogging the underside of the deck. These can jam the blade. Disconnect the spark lead before attempting to move the blade to remove clippings! |
Protecting Your Hands
Ideally you should wear gloves to protect your hands from grime which can irritate sensitive skin, especially if you have to change engine oil or your hands are in contact with gasoline or diesel. Disposable latex gloves aren't recommended, and vinyl gloves are only supposed to have "fair" resistance to gasoline/oils, according to specs. From experience, I've found that vinyl disposables seem to be much more durable than latex though, and withstand contact with oil, grease, and gasoline for short periods. Nitrile rubber gloves are the most resistant to these chemicals.
Recommended Hand Cleansers
If you dispense with gloves and work barehanded (which inevitably happens because it's difficult to handle small parts with gloves), an abrasive hand cleanser will do a much better job than soap at removing grime and is pretty much essential. I use Dreumex anti-bacterial Pumice Heavy Duty Hand Cleaner, available from Amazon for removing oil and grease from my hands. It's also good for removing oil paint, tar, soot and general garden grime. (even used it once for taking black bicycle grease out of a whitecarpet!)

Dreumex Pumice Heavy Duty Hand Cleaner Orange Lotion Bottle
Amazon by permission of Dreumex
- Socket wrench set. Inch sizes for American engines and metric for European or Japanese engines. You don't need to spend a fortune on a set, since you are not going to be using them every day. However, don't buy rubbish either as you can use them for working on other equipment. A 3/8 inch ratchet is fine, or a smaller 1/4 inch size for use in confined spaces.
- Combination wrenches, open at one end and ring at the other end, come in handy also. These can be used for situations when a nut needs to be undone but the threaded section of the bolt extends too far beyond the nut to fit into a socket. Wrenches are also known as spanners in the UK. Sockets or wrenches don't need to be greater than 3/4 inch AF (across the flats) or 19mm in size.
- Plug spanner for removing spark plugs.
- Screwdrivers. Flat head and Philips, both the big and small sizes.
- Magnetic tray. This is useful for stopping all those small parts from going AWOL!
- Torque wrench for tightening the bolt which holds on the blade and spark plug.
- Feeler gauge for checking spark plug or points gap.
Note: Tuning an engine refers to the process of adjusting the engine to give optimum performance. This includes setting the spark plug and points gap and adjusting the fuel/air mixture and the idling speed.
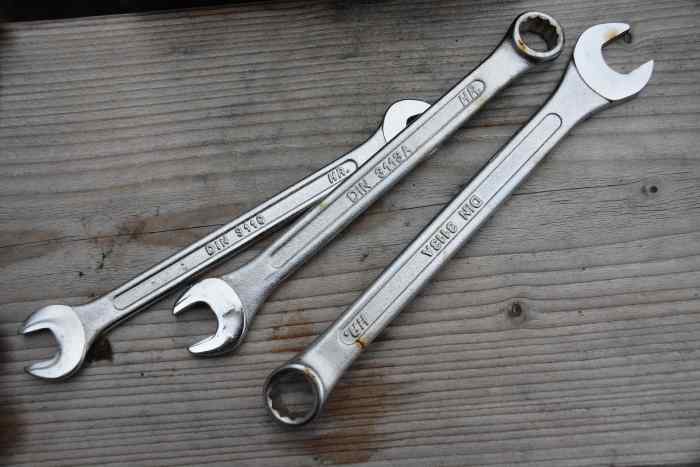
Combination wrenches (spanners) - Open at one end and ring at the other
Fantareis- Public domain image via Pixabay.com
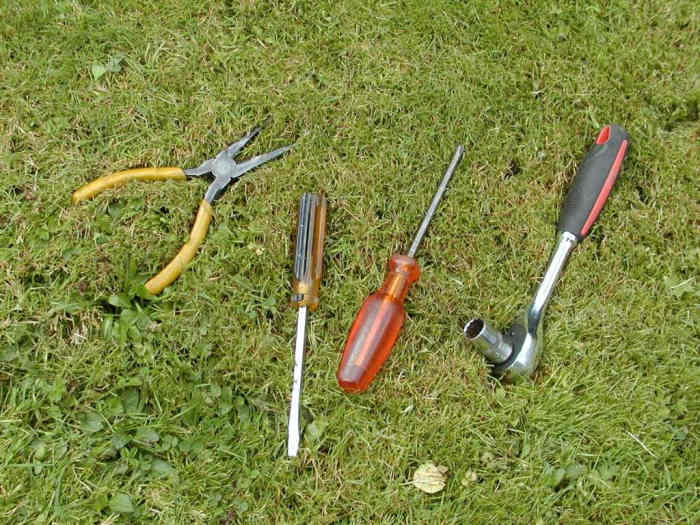
Long nose pliers, flat blade screwdriver, Philips screwdriver, and socket wrench.
© Eugene Brennan
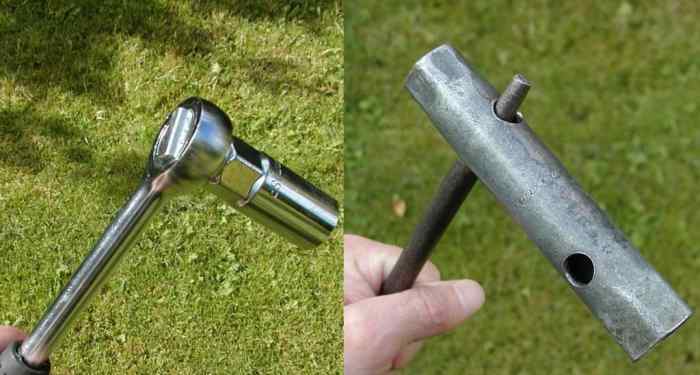
Two styles of plug wrench: Socket wrench and box wrench/spanner.
© Eugene Brennan
Before Dismantling
Before you start dismantling everything, take some high resolution photos with a digital camera if there is any chance you are going to forget how to reassemble the parts.
Also, if lots of washers, bushings, springs, and nuts on a shaft or bolt need to be removed, you can string them onto a piece of wire to keep track of the reassembly sequence.
Avoiding Oil Leaks Through the Breather
The sump (the reservoir at the bottom of the engine which holds the lubricating oil) is vented to the atmosphere through a baffle/reed valve arrangement called the breather. Venting is necessary so that air can enter and leave the sump as the piston moves in and out of the cylinder. The baffle prevents drops of oil from getting blown out of the vent. Also, some unburned gases may get by the piston and into the crankcase. This would eventually cause a rise in pressure without the inclusion of a vent. The breather is sometimes connected to the carburetor through a tube so that any droplets of oil which manage to get through the valve, and unburned gases are sucked into the engine and burnt. (A faulty breather valve can cause excess oil consumption.) Oil can leak out through the breather if the engine is turned on its side with the breather facing downwards and the blade is turned.
If the Starter Cord Is Hard to Pull, Slips, or Won't Wind Up
If you find it difficult to pull the starter cord, there are three likely causes:
- Firstly, clumps of wet grass or moss can jam the underside of the deck and prevent the blade from turning. Before removing clippings and attempting to turn the blade to clear the deck, disconnect the spark plug lead.
- The flywheel brake may be preventing the engine from turning. When you release the "dead man's handle" on the handle of the mower, a switch is closed and cuts the engine. A brake also springs into place and slows down the engine. If this brake has seized in place or the cable which operates it has snapped, this will prevent the engine being turned. You will need to remove the cowling on top of the engine to get at this brake.
- Recoil starters on some engines have about half a dozen steel balls which act as part of the ratcheting mechanism. These can get rusty and either cause the starter to slip and not crank the engine or prevent it from winding back up properly. You can clean the balls with fine wire wool— add a squirt of light machine oil to the compartment which houses the balls when replacing them. (Scroll down for instructions.)
The Ignition System: Best Place to Start Troubleshooting
The function of the ignition system is to create a spark at the plug and ignite the fuel/air mixture in the cylinder. A device called a magneto generates the high voltage, and either mechanically operated points or an electronic switch will trigger the spark at the appropriate moment in the four-stroke cycle.
Over 90% of the time, problems with gas engines are due to an issue with the carburetor. However, the spark plug is easy to check out first.
See the ignition system diagram below.
The Magneto
On a push mower and other engines without a battery (such as chainsaws, trimmers, and motorbikes without batteries), a device called a magneto is used to generate the high voltage spark. Magnetos are even used on piston-engined aircraft for safety reasons, so that battery or alternator failure doesn't result in the engine cutting out. A magneto is sort of a cross between a generator and a transformer and has a primary and secondary coil.
The magneto is mounted adjacent to the flywheel (the thing with fins at the top of the mower, which spins). A magnet embedded in the edge of the flywheel induces a pulse of current in the primary coil as it moves rapidly past the poles of the magneto. When the current reaches a peak, a set of switch contacts called points opens, interrupting the current. This causes the magnetic field in the primary coil to rapidly collapse, inducing a spike of voltage in the secondary coil. This coil, which has lots of turns of wire, steps up the voltage to about 10,000 volts (or more). A capacitor, also known as a condenser, absorbs the current produced by the primary coil enabling the magnetic field to collapse rapidly. Modern engines have electronic ignition and points are replaced by an electronic switch called a thyristor or SCR (Silicon Controlled Rectifier).
Some engines (such as those on ride-on mowers) don't have magnetos, and instead they'll use an on-board battery and an ignition coil to produce a spark—similar to the system on a car.
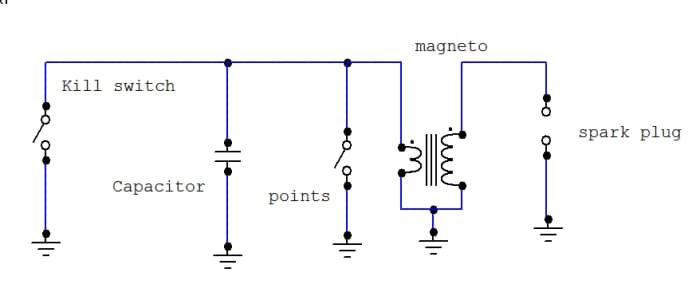
Schematic of lawn mower ignition circuit with mechanical points. The points are connected to the primary of the magneto, the spark plug to the secondary.
© Eugene Brennan
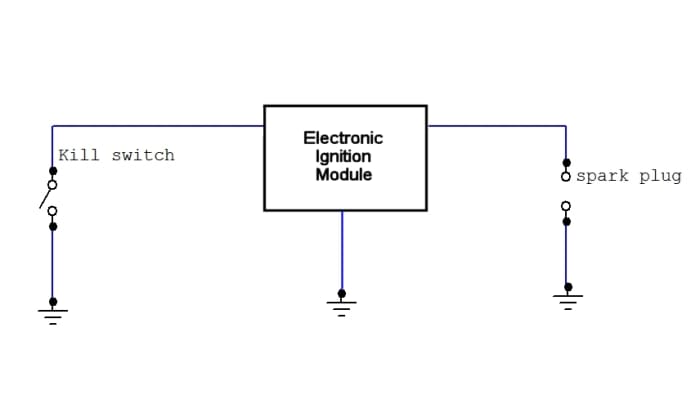
Modern engines have electronic ignition and there are no points to clean. If the ignition module fails, the complete unit needs to be replaced.
© Eugene Brennan
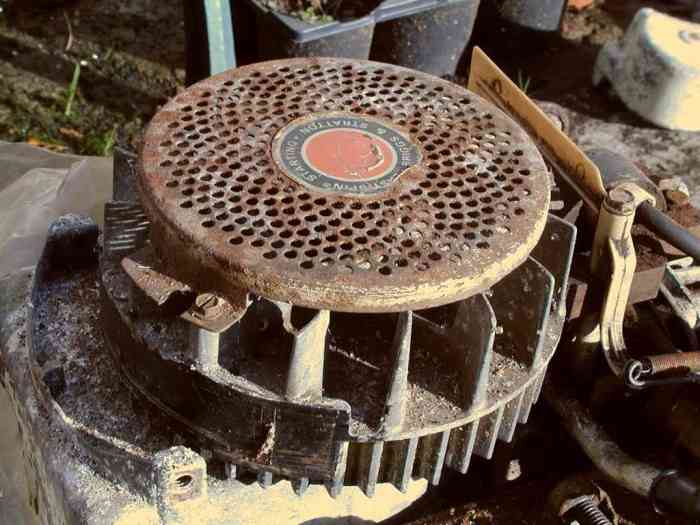
Engine flywheel, visible when the cowling or cover over the mower is removed.
© Eugene Brennan
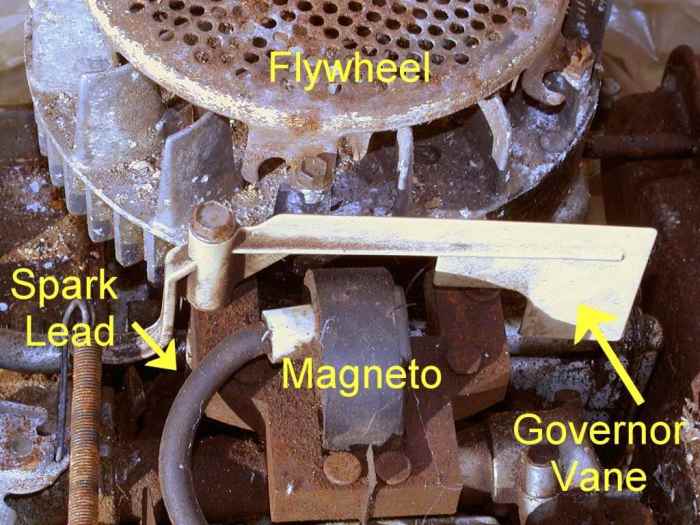
Flywheel, magneto, and governor vane.
© Eugene Brennan
Testing for a Spark at the Plug
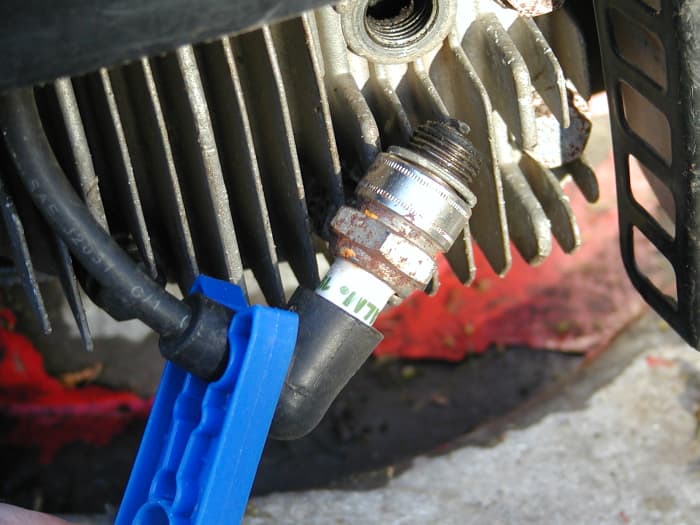
- First, check the cable feeding high-voltage to the spark plug—this must not be loose and should be attached tightly. Sometimes, the cable can pull out of the rubber boot and terminal which pushes onto the spark plug. Then, using a spark plug wrench, remove the plug, re-attach the plug lead to the plug, and place the threaded part of the plug in contact with the engine block to ground it.
- Now, pull the starter cord and check for a spark. You will need to hold the plug tight against the engine somehow as it may bounce around when you pull the starter cord. This is where an assistant might come in handy as it may be difficult for you to see the plug from where you are pulling the starter cord. Try pushing the plug tight against the mower with a piece of plastic or similar, such as a plastic clothes peg. The plug could be held by the lead but if this is damp or the insulation is bad, you could end up getting a shock!
- If you don't see a spark at this point, there might be a crack in the plug insulation or it could be dirty and need to be cleaned with an old toothbrush and some gas. A toothbrush-sized wire brush is even better. Allow it to dry and try for a spark again. If you are still not successful, try another plug and check again. There is no harm having a spare plug for this purpose or using a plug out of a car, but don't use this plug in the engine unless it is the correct type as it could hit the piston causing damage if it is too long.
- The outer electrode of the plug should be filed square with a small file if it has become rounded. The spark plug gap should usually be set to 0.030" (30 thousandths of an inch) / 0.75 mm, but check the recommendations of your engine manufacturer. The gap is measured with a feeler gauge (see photo below). These are usually in the form of a set of steel strips of varying thickness from about 0.002 inch to to 0.030 inch.
Caution: The threads on a plug are steel, but the engine block and cylinder head are usually aluminum alloys, which is softer than steel. So the threads can be damaged if you aren't careful. Check that there is no grit or other debris on the threads of the plug or the engine before screwing it in. Make sure the plug doesn't become cross-threaded and don't over tighten it. Ideally, you should use a torque wrench to tighten the plug or when re-attaching the blade on a mower.
If you do damage the threads and the plug won't tighten, you can get a Helicoil fitted in a repair shop. This involves tapping the cylinder head and screwing an insert into place which has internal threads to suit the plug.

Removing the plug. Keep one hand on the plug wrench to stop it slipping off and damaging the spark plug.
© Eugene Brennan
Hold the spark plug against the cylinder head and pull the starter cord to check for a spark. You may need an assistant. A plastic clothes peg may be a good idea to prevent shock in case the lead is damp!
© Eugene Brennan
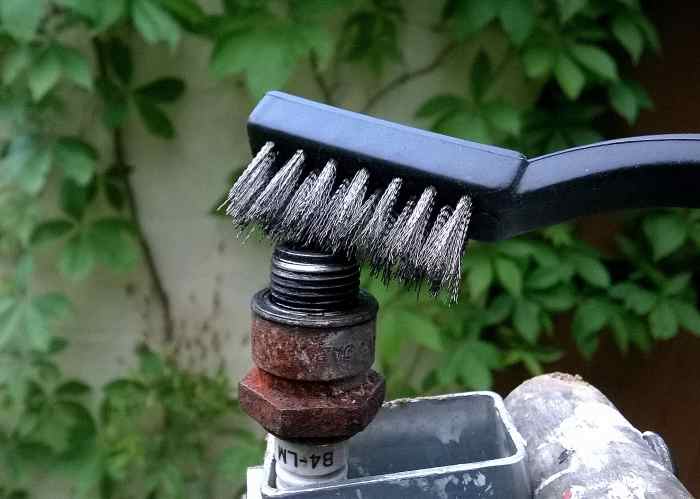
A "toothbrush" style wire brush is useful for cleaning soot from plugs.
© Eugene Brennan
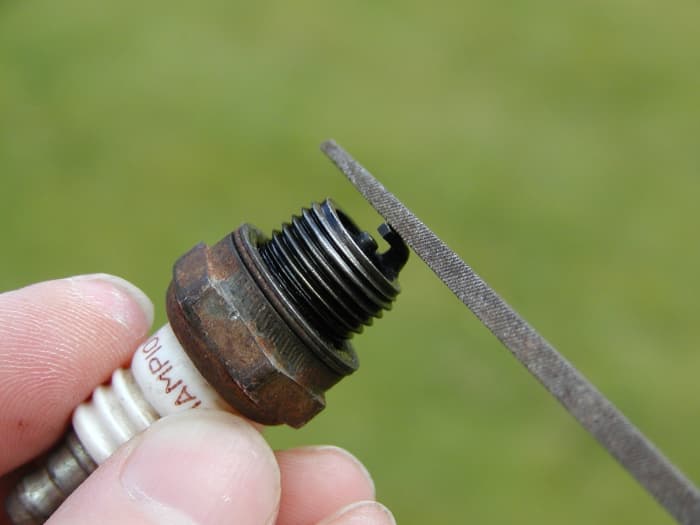
The outer electrode of the plug should be filed square if it is excessively rounded.
© Eugene Brennan
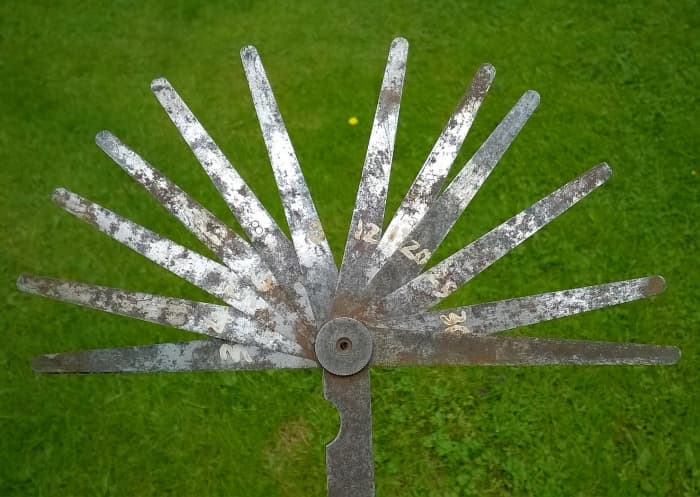
The plug gap (electrode spacing) is measured with a feeler gauge. These come as a set.
© Eugene Brennan
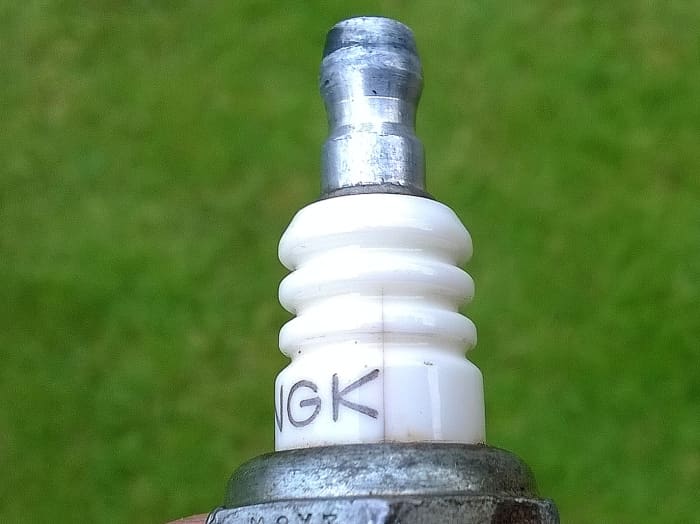
Hairline cracks in the insulation of plugs can short out high voltage and result in no spark across the gap
© Eugene Brennan
Wiring and Connections
If you don't get a spark, inspect the wiring on the engine. Just like on a car, the ignition system uses the engine block as a ground, so check to make sure that all ring crimps are screwed down tightly and not loose. Damaged insulation can short voltage to the engine block. Spades can pull off, and screws holding ring crimps can work their way loose due to vibration.
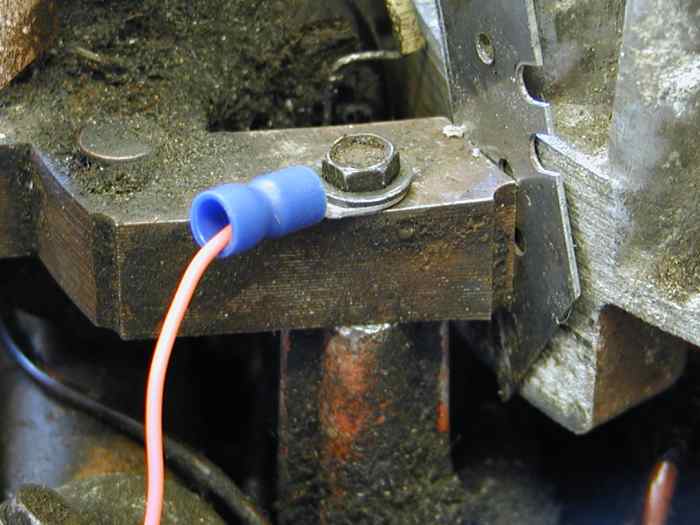
Check for loose or dirty connections.
© Eugene Brennan
The Kill Switch
If you still can't produce a spark, there could be a problem at the kill switch. This shuts off the engine by shorting out the coil on the magneto and preventing a spark from being created when the mower is turned off. The switch is operated when you release the "Dead Man's Handle" on the mower or set the throttle to the stop position. Trace the wire from the magneto coil to find this switch. You will more than likely have to remove the cowl from the top of the engine and possibly the flywheel to check this.
Check the switch using the continuity or the lowest ohms range on your meter. The switch should be open-circuit when the engine is running and a short circuit when the engine is off. Remove one of the connections to the switch when checking. Otherwise, the resistance of the magneto coil will give a false reading.
Electronic Ignition/Capacitor Discharge Ignition (CDI)
Nowadays, engines have electronic ignition system known as capacitor discharge ignition (CDI) and the modules can fail, requiring replacement. If the ignition coil doesn't produce a spark after you've tried a new plug and you've checked the kill switch to make sure it's not shorting out, there's nothing more you can do but replace the module.
Testing the Magneto Coil on Older Engines With Points (See Schematic Above)
The resistance of the secondary coil (which connects to the spark plug) can be measured with a DMM (digital multimeter). If you don't know how to use one, read How to Use a Digital Multimeter (DMM) to Measure Voltage, Current, and Resistance.
- First, you'll need to connect the probes of the meter between the two ends of the coil. One end of both the primary and secondary coils is grounded, so connect one probe to the engine and the other to the end of the spark lead. This should give a reading between 2.5 and 5 kiloohms. However, this doesn't necessarily mean that the coil is okay, since high voltage could be tracking to ground through a breakdown in insulation. An open circuit reading indicates a fault, however.
- Check the grounding connection from the end of the coil to the engine block. This is likely a ring crimp terminal, so make sure it is tightly connected and not an open circuit at this point. The resistance of the primary coil should be about one ohm, dropping to less than an ohm as the flywheel is turned, causing the points to close.
- If the resistance doesn't change when the flywheel is turned, the points could be at fault. Make sure the engine is set to the start position (which opens the kill switch) when measuring. Otherwise, the kill switch will short out the coil, giving a false reading.
Cleaning Points on an Old Engine
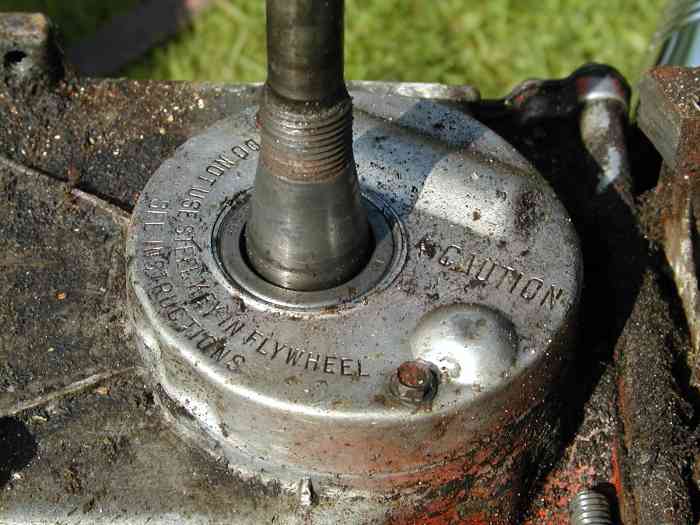
Most modern engines have an electronic ignition system. According to Briggs and Stratton, this typically applies to engines manufactured after 1983. The engine below is probably about 40 years old and the points need to be cleaned.
Dirty contact points can prevent a spark occurring at the plug. Points in an engine are basically a switch which opens when the current through the coil of the spark generating device (the ignition coil or magneto) is at its maximum. This creates a spike of voltage at the spark plug. These points can be come tarnished or corroded and pitted over time and need to be cleaned. A rubber oil seal is fitted at the exit point of the crankshaft from the sump, and at the top of the engine block. If the engine tends to misfire (no sparks occurs in a cycle), it can be due to oil getting past this seal and splattering over the points. A pool of oil in the points compartment is evidence of this. It is somewhat of an ordeal to get at the points which are usually under the flywheel of the engine.
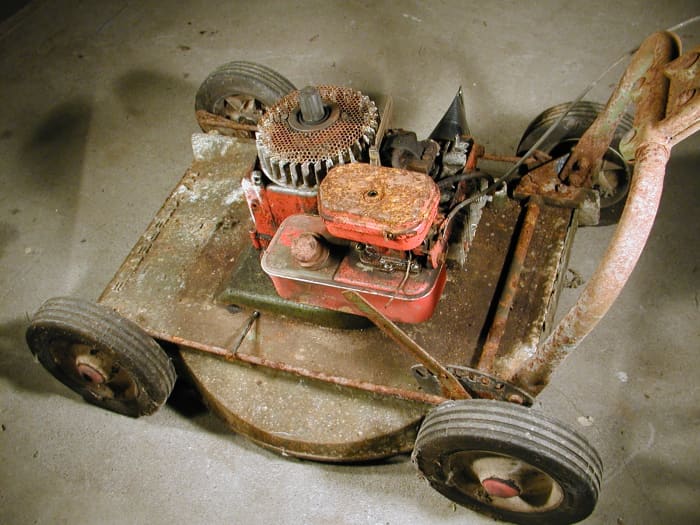
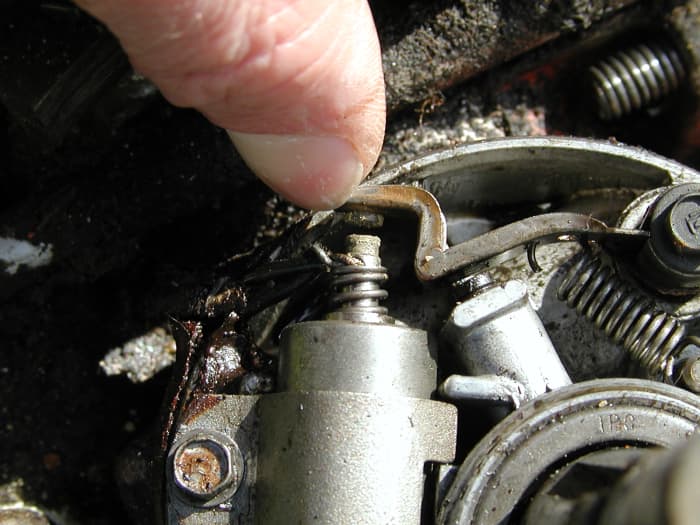
This mower has been stored in a leaking shed and rusted up for over 20 years without being started. I'm going to check out the points and carburetor to see if it's ok. This machine has a pump-and-weir type carburetor.
© Eugene Brennan
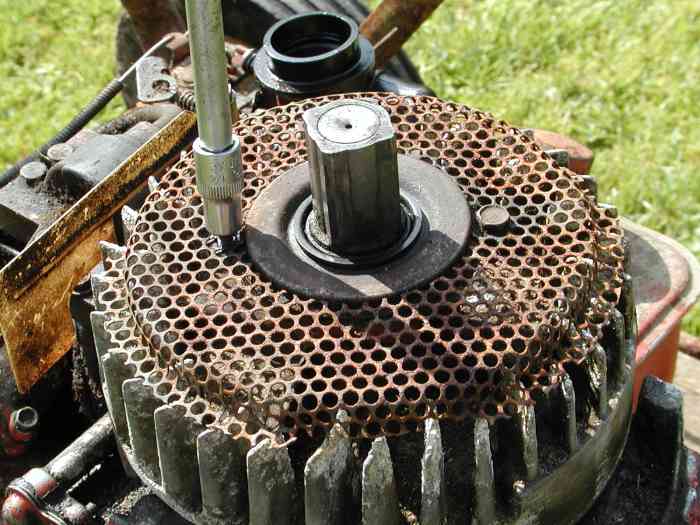
First, remove the mesh on the flywheel.
© Eugene Brennan
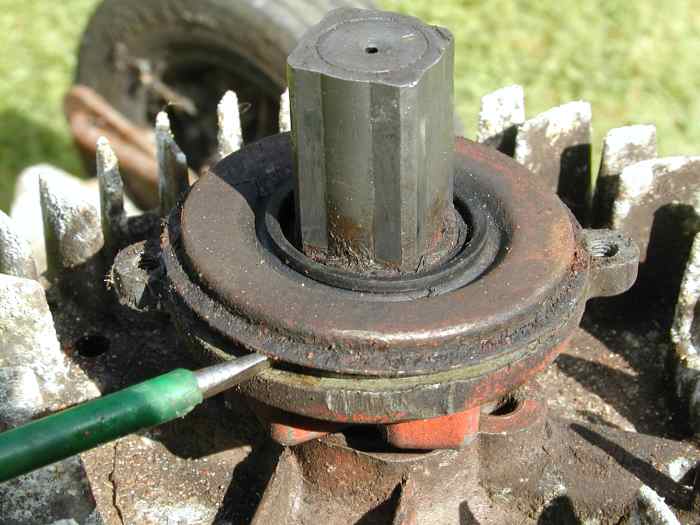
Prise off the plate covering the ratchet mechanism.
© Eugene Brennan
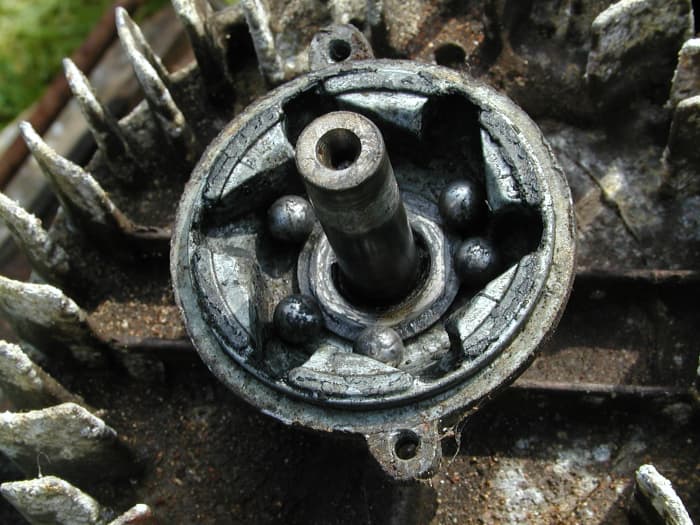
Remove the steel balls which form part of the ratchet mechanism. If they are rusted, clean them with fine wire wool and add a little light machine oil when replacing.
© Eugene Brennan
Removing the Flywheel
- First, remove the balls from the ratchet mechanism piece. Check to see that they're not rusted and stuck in the mechanism, and add a little light oil to the balls later on when you replace them.
- Next, use a pipe wrench (Stillsons) to remove this piece which holds on the flywheel. Loosen it counter-clockwise.
- Don't put pressure on any lugs in case they break off. I used a flat steel bar under the flywheel wedged against the engine body to immobilize it. (There's actually a special flywheel holding tool for doing this.) Don't wedge anything into the fins of the flywheel which could end up snapping them off if excessive torque is required to loosen the fitting.
- The flywheel is wedged onto a tapered shaft, and a special lawn mower puller is available for removing it. You're not really supposed to do this, but if you keep gently tapping the underside of the flywheel all the way around with a light hammer, it should be easy to release it. (Gently tap the thickest part with the magnet, but don't hit it hard!)
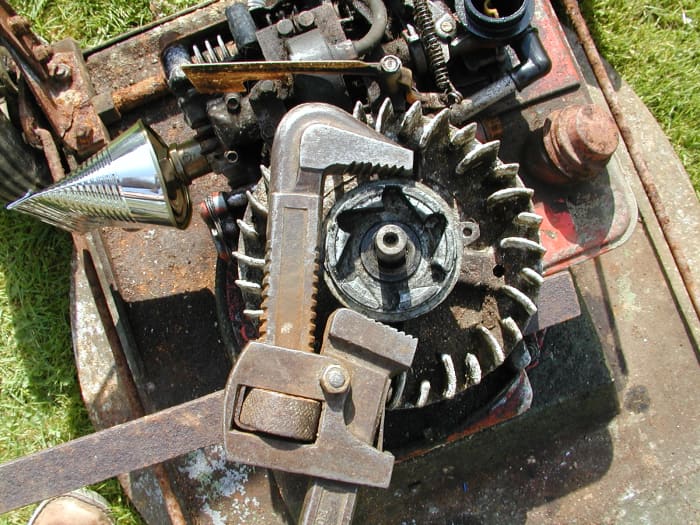
Use a pipe wrench (Stillson) to remove this piece. Keep the jaws away from the screw lugs to avoid damaging them.
© Eugene Brennan
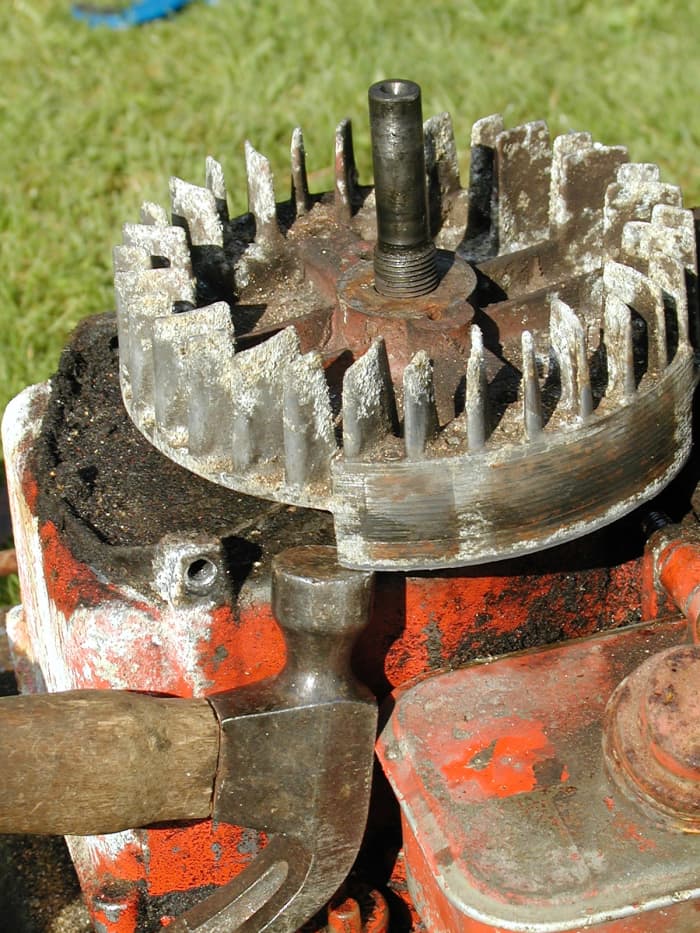
Lightly tap the flywheel all round the perimeter to release it. First tap the heavy part with the magnet inserts as shown, and the similar piece on the other side. Don't lose the iron key in the flywheel shaft.
© Eugene Brennan
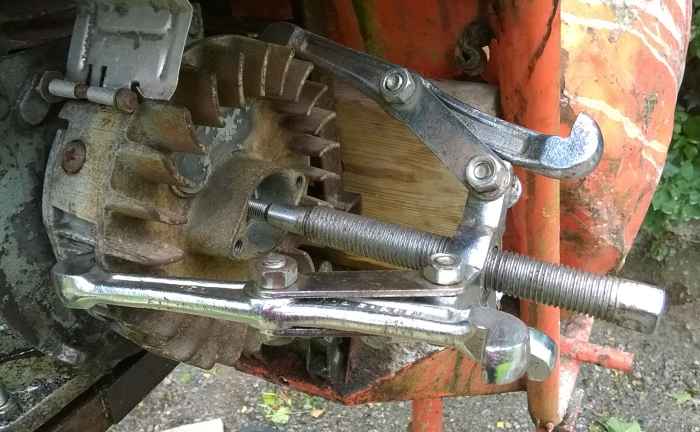
Ideally, remove a flywheel with pullers.
© Eugene Brennan
The points are inside this compartment.
© Eugene Brennan
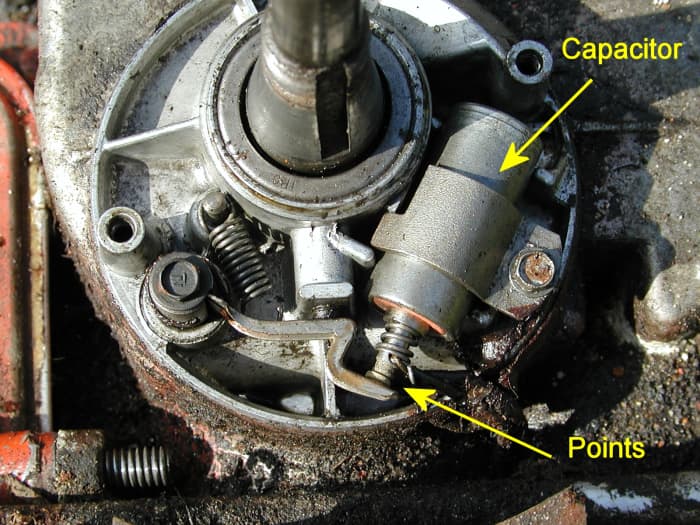
Points and capacitor (originally called a condenser): If the rubber seal on the crankshaft is faulty, oil can accumulate in this compartment and splash onto the points, causing misfiring.
© Eugene Brennan
Clean any tarnish and pitting from the points with a fine cut file or fine sandpaper. Take care, as the points are coated with special material to withstand arcing. Only lightly file. If you overdo it with the file, you'll end up removing the coating
© Eugene Brennan
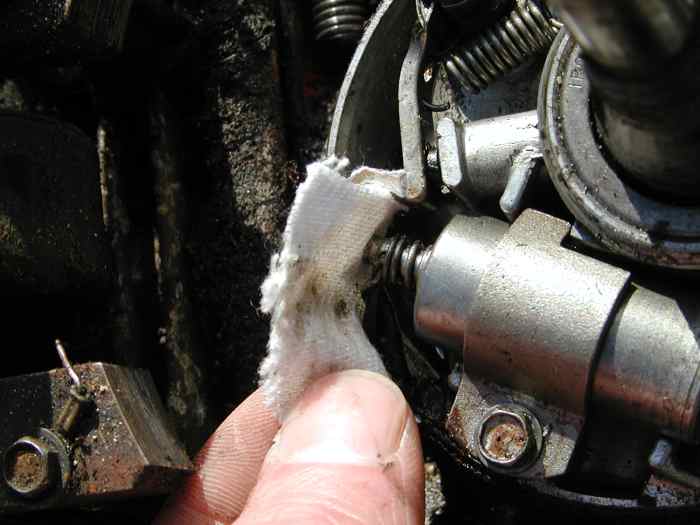
Finally, remove any residue or oil with a piece of cloth.
© Eugene Brennan
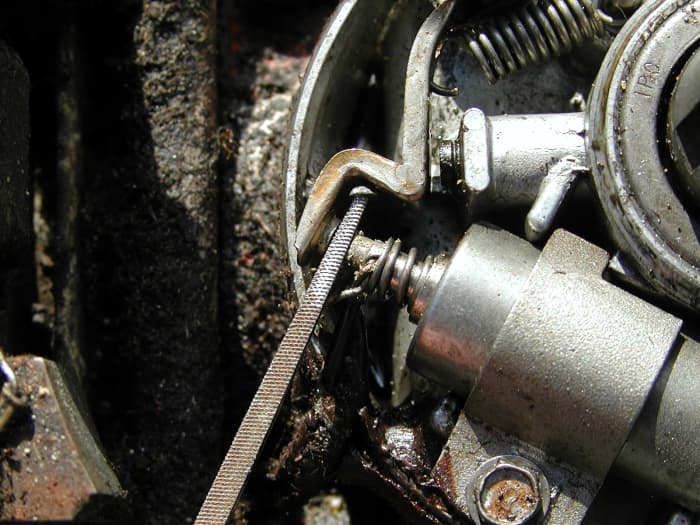
The points gap is set on this Briggs and Stratton engine by loosening the bolt and moving the capacitor. It should be about 0.02 inch (check it with a feeler gauge).
© Eugene Brennan
Testing Correct Operation of Points and Setting the Gap
- Connect one probe or a crocodile clip to the capacitor.
- Connect the other probe to the rocker arm.
- Set your multimeter to the lowest resistance range.
- With the controls on the mower set to the "on" position, and with the points open, resistance should be less than one ohm and is effectively the resistance of the primary coil of the magneto and the leads of your meter in series.
- Now turn the crankshaft until the points close. The resistance should now drop to a lower value and is just the resistance of the leads. The points gap is set either by releasing a screw and moving the capacitor, or turning a screw. The gap should be typically 0.02 inches, but check the specs for your engine to get a specific value.
- If you're getting a weak spark, thin and not very blue, it's possible that the capacitor (condenser) is faulty. It's not really possible to test this component without special equipment, however if you test it with a multimeter set to a low ohms range, a shorted capacitor will have a definite resistance. A good capacitor should give an open circuit reading, i.e. usually an overload reading shown as "1" on the display.
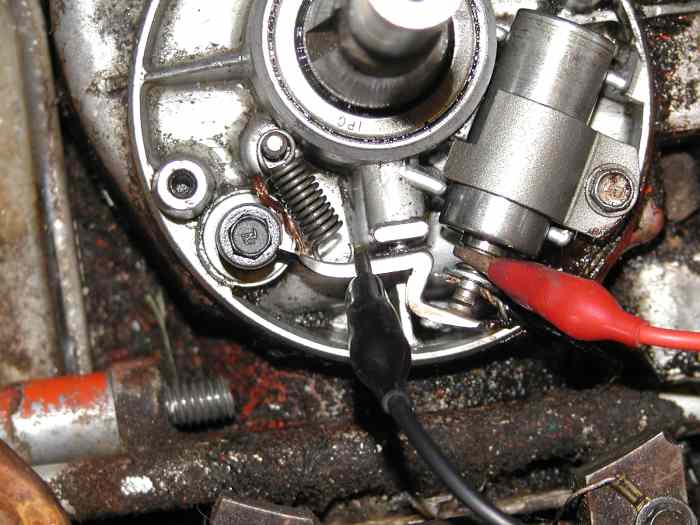
Checking points close ok
© Eugene Brennan
The Carburetor
If the ignition system is okay, you'll need to check out the fuel system next.
Troubleshooting books and guides often advise checking whether fuel is actually reaching the engine by removing and examining the spark plug after several pulls of the starter cord. It should be damp but a wet plug indicates flooding. However by the time the plug is removed and if weather is warm, any dampness can evaporate, so this isn't a totally reliable method of identifying a problem with the carburetor.
Fuel flows from the tank to the carburetor. The function of this device is to create an explosive mist of fuel mixed with air, which is sucked into the engine to be burned and provide power. An air filter cleans the incoming air to prevent malfunction and damage to the engine. Several problems in this section of the engine can cause difficulty in starting or loss of power. These include:
- Dirty air or fuel filters
- Clogged jets
- Parts that are sealed poorly
- Punctured or worn components
- Moving parts sticking
- Water in the tank
Schematic of a Carburetor
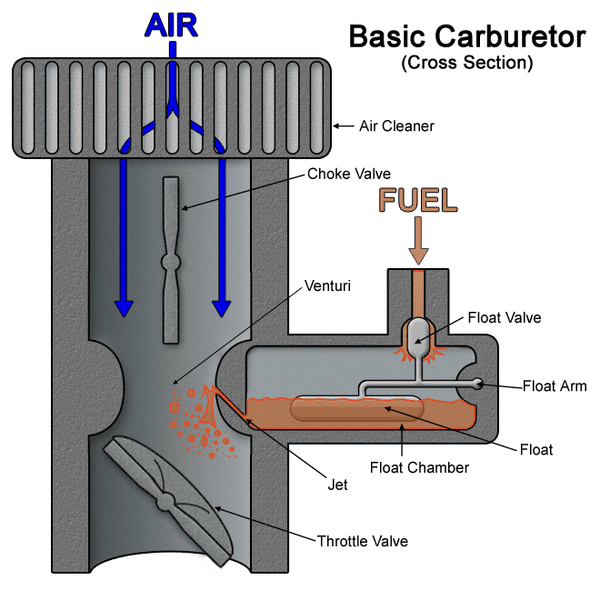
A carburetor filters air and mixes it with fuel, forming a fine mist which gets sucked into the engine.
Wikipedian Prolific, CC by SA 2.5 generic via Wikimedia Commons
Carburetor Seal or O-Ring
The carburetor should make a good seal with the engine by being screwed or clamped on tightly, and any gaskets or o-rings shouldn't be worn or damaged.
Water in the Tank
- Water in the gas tank can cause an engine to splutter and stall. Maybe you left your mower exposed all winter, causing water to leak through the vent in the tank cap, or you could have gotten bad fuel from your gas station. Leaving gas in the tank over winter can result in an accumulation of moisture, especially if you use fuel with an ethanol content. Ethanol attracts some moisture which normally exists as a suspension in gas (like cream in milk). If a mower is left sitting for months, this can eventually settle out to the bottom of the tank, and only a couple of teaspoons may be enough to cause difficulty starting.
- Water is denser than gas and will sink to the bottom of the tank. If you shine a torch inside, you may see globules of water at the bottom (a maglite is useful for this sort of thing because the beam can be focused to light up the bottom of the tank).
- If you drain the tank of gas, you can use a cloth or piece of sponge pushed onto the end of a long screwdriver to soak up any remaining blobs of water at the bottom of the tank. If a lot of water has lodged at the bottom, it may also have passed through the fuel line into the carburetor. In this case you will have to remove the float bowl as described below, and drain the contents of the bowl plus whatever remains in the fuel tank.
The Air Filter or Cleaner
The function of an air filter is to remove dust, grit, grass, and other grime from the airstream before it enters the engine. Without a filter, this material would scour the piston and cylinder, causing premature wear of the engine over time. Dirt would also clog the tiny jets which fuel flows from inside the carburetor.
The air filter must be clean for optimum engine operation. A dirty, clogged air filter will starve an engine of oxygen, causing a reduction in power, excess fuel consumption or flooding of the carburetor, and difficulty in starting. Foam elements can be washed in hot water and soap to remove oil and dirt. Next, squeeze the foam dry in a cloth. Pour a teaspoon of motor oil onto the foam and massage it evenly through the element (the function of the oil is to catch dust passing through the foam). It is possible to clean some of the dust from a paper filter by blowing from the inside with compressed air. These type of filters, however, should ideally be replaced.
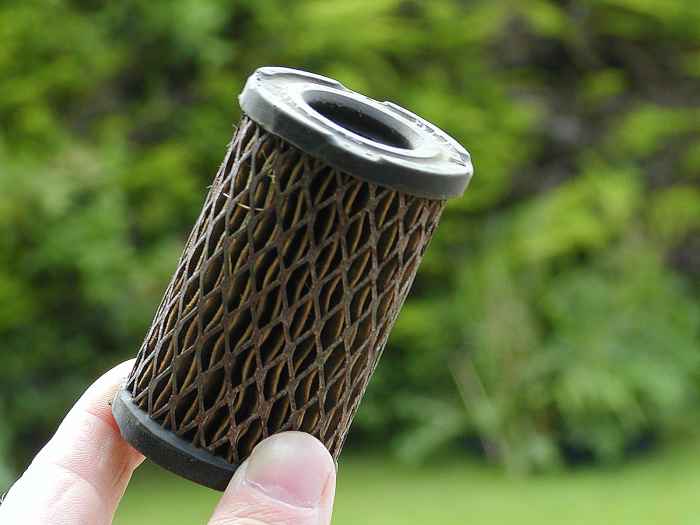
Paper air filter.
© Eugene Brennan

Foam air filter.
© Eugene Brennan
The Choke
The choke is simply a flat disk mounted on a shaft in the air intake of the carburetor, known as a butterfly valve. When you turn on the choke, the shaft is turned so that the disk blocks the airflow, and there is greater suction in the intake. This allows more fuel to be sucked in and also makes for easier starting. Chokes are usually automatic but can be manual on some engines. In this case, they must be turned on when starting an engine and then turned off after the engine has been running for several seconds. If an engine is hot, leaving the choke on will likely flood the carburetor and cause difficulty starting.
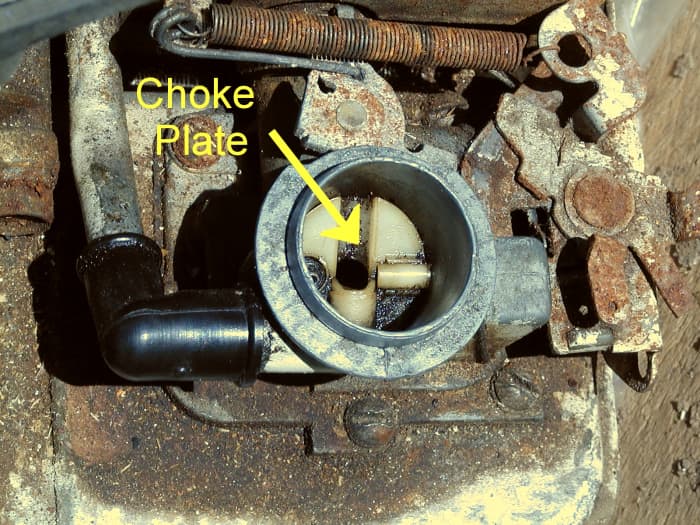
Carburetor air intake showing choke plate (air filter has been removed) on a small 3 1/2 HP Briggs and Stratton engine.
© Eugene Brennan
Fuel Line
A kinked or blocked fuel line between the tank and float bowl can restrict fuel flow to the engine.
Float Bowl Type Carburetor
If the fuel tank is located above the carburetor, it is likely to be a float bowl type. (See photo below.)
Dirt and gum are the greatest enemies of carburetors, since they may contain several narrow passageways through which fuel flows. Over time, gum deposits can narrow these passageways. Also, minute particles of dust contained in fuel will bypass a fuel filter and make their way into the carburetor. This can also clog everything up. A proprietary carburetor cleaner can be used to clean everything out.
How the Float Bowl Works
The float and bowl work like a toilet cistern, keeping the fuel at a constant level so that it can be sucked up into the carburetor. The buoyancy of the float causes it to rise. When the gas in the bowl reaches a set level, a needle at the top of the float is forced into a valve seat, shutting off entry of fuel into the bowl. Without this system, gas would just gravity-feed into the carburetor, flooding it. If your lawn mower won't stay running for more than a few minutes, it's possible that the float bowl isn't filling or is filling very slowly. If it fills slowly, the mower cuts out, but can often be re-started after it's been left for a while (because the bowl re-fills).
Another problem is that the needle doesn't adequately seal and stop inflow of fuel into the bowl when it becomes full. This may eventually cause fuel to overflow and leak out of the bowl if it's vented.
Checking the Float, Bowl, and Jet
- Firstly, if a gas tap is fitted, turn this off. Alternatively, clamp off the fuel line with a vice-grips, or something similar (this mightn't totally cut off flow). You can dispense with clamping the line, but don't panic when fuel starts to run out, in any case it should be just a trickle. Have a container ready and hold it underneath to catch any fuel.
- Loosen and remove the bowl nut (which looks like a bolt, don't ask me why its called a nut!) on the underside of the bowl, taking care not to lose any fiber washers.
- Fully remove the bowl.
- Loosen the vise-grips or turn on the tap and fuel should flow freely from the inlet valve. Gently press the float upwards and ensure it cuts off the flow. If it doesn't, debris may be blocking the needle valve, preventing the needle from seating properly. Also, the float could be punctured and not able to float properly. Both of these conditions will cause flooding of the carburetor and possibly fuel flowing out of the carburetor air intake via the air filter.
- If no fuel flowed out of the needle valve when the float bowl was removed or the fuel tap turned on, there could be two causes. Firstly the fuel filter may be blocked. This can be a separate component in the fuel line or at the intake of the fuel line inside the tank. The second cause is a blocked valve preventing fuel from flowing into the bowl, so you need to clear this out. If the bowl fills slowly due to a partially blocked inlet valve, the symptoms are a mower that starts then dies after a couple of minutes as fuel is used up quicker than it can flow into the bowl from the tank. Another possibility on larger engines such as those on lawn mower tractors is a malfunctioning fuel pump.
- If there doesn't appear to be any problem with fuel flowing into the bowl, the fault could be a clogged main fuel jet. If you have an air compressor, you can try blowing through the jet with an air gun. However, it could be gummed up, and in this case you can try using an aerosol carburetor cleaner. Insert the flexible straw of the aerosol into the jet and use a few puffs to clear any debris. Don't use steel wires, pins, or needles to poke at the jets as the soft brass surfaces can be damaged (strands of soft copper wire from a power cable should in theory be ok because they're softer than brass).
- Finally remove any debris in the filter bowl and check the hollow brass bowl nut for any blockages caused by dirt. On some carburetors, this serves two functions, it holds the bowl in place and also acts as part of the jet system. Once you have done all this, replace the bowl, taking care not to over-tighten the brass bowl nut and try starting the engine again.
Bad Seals
O-rings and gaskets can shrink, crack, and lose their elasticity over time. Replace any parts that show signs of aging.
Solenoid Valves
Larger engines, for example, those on ride on mowers may incorporate a solenoid valve on the float bowl. The solenoid is an electromagnet that opens a valve when voltage is applied to the coil, allowing fuel to flow. Check with a multimeter that voltage is being applied to the coil. (This also applies to starter motor solenoids.) Also, solenoids can get stuck, or the valve can become clogged.
Carburetor on a Tecumseh 5 HP engine.
© Eugene Brennan
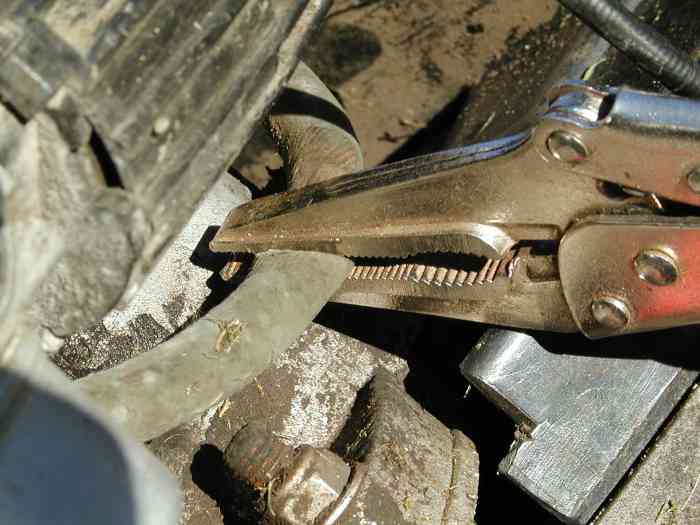
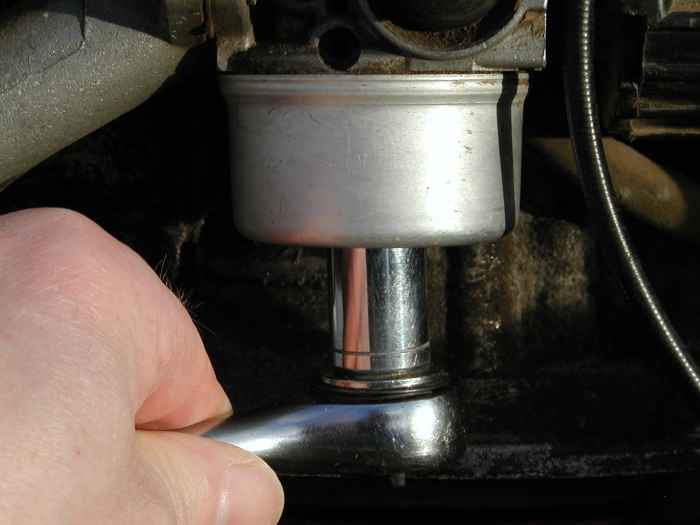
Fuel line clamped off with vise grips.
© Eugene Brennan
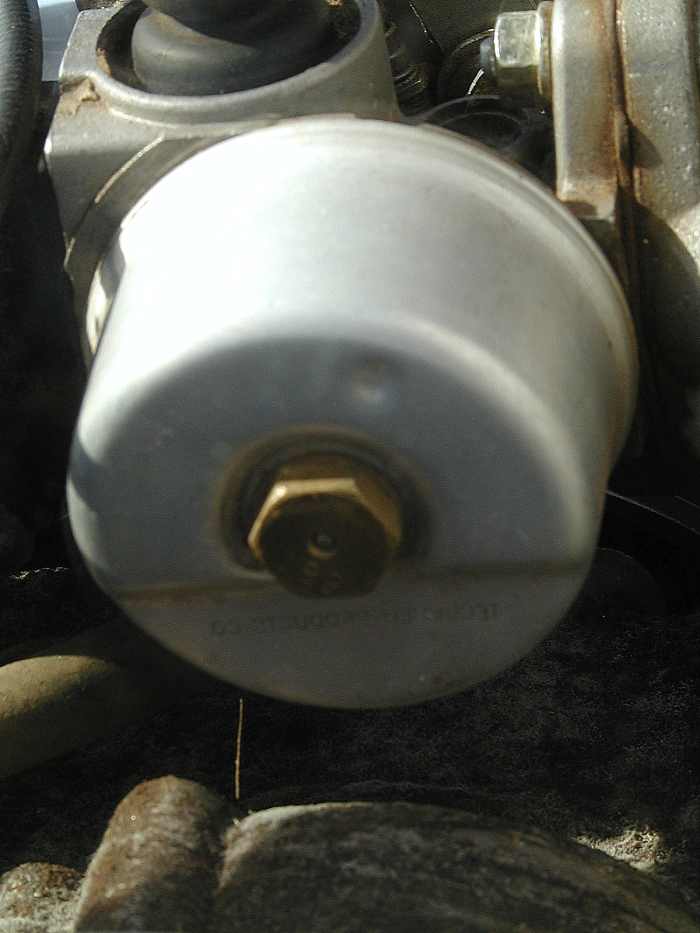
Float bowl held on by bowl nut (which looks like a bolt when removed).
© Eugene Brennan
Remove bowl nut with socket wrench.
© Eugene Brennan
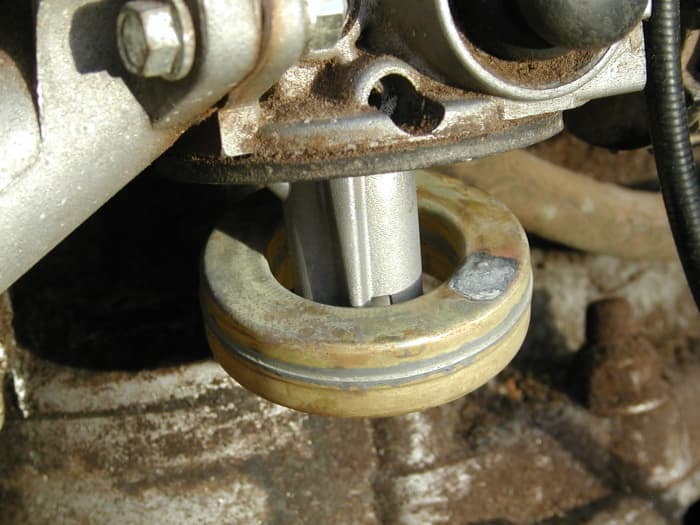
Once the bowl is removed, the float can be examined. Make sure it moves freely and isn't stuck and look for holes or signs of corrosion.
© Eugene Brennan
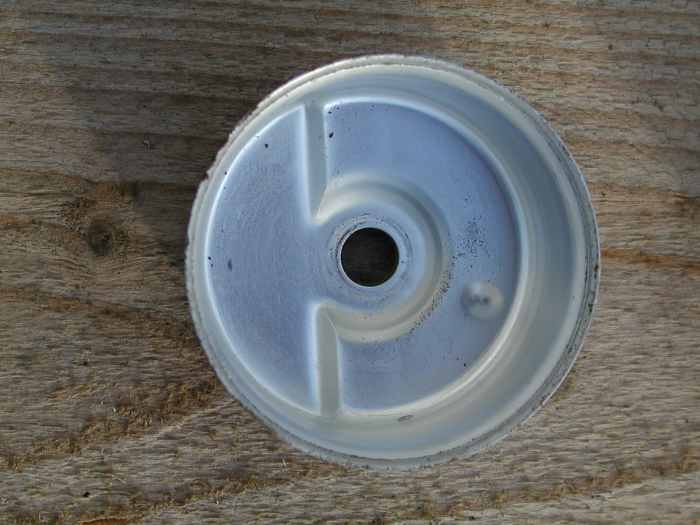
Check that bowl is free from debris.
© Eugene Brennan
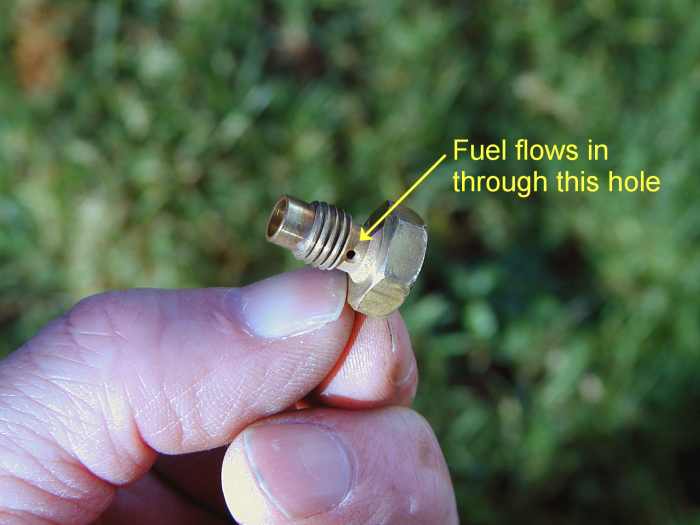
Bowl nut from a lawn mower: Check the orifices are free of dirt.
© Eugene Brennan
Bowl nut from a lawn mower
© Eugene Brennan
If the engine still won't start after cleaning the bowl nut, and the float works okay and allows fuel into the bowl, try cleaning the jet with carb cleaner.
© Eugene Brennan
Pump-and-Weir Type Carburetor
Some tanks are located below the carburetor, where a pump-and-weir system is used. This is the scenario on small Briggs and Stratton engines.
- Fuel is pumped from the tank by a diaphragm operated by suction from the air intake.
- It then flows into a small chamber/reservoir with a weir that allows gas to overflow back into the tank once the chamber is full. This ensures the fuel level is constant, independent of the fuel level in the main tank.
- Mesh fuel filters cover the ends of the tubes that suck fuel from the tank to the chamber and chamber/reservoir to the carburetor venturi, and these can become coated with dirt, restricting the flow of fuel.
- The diaphragm pump on this type of system can become worn and punctured, causing the carburetor to suck in too much fuel. Symptoms are an engine which repeatedly speeds up and down, produces black spoke, plus a smell of unburnt gas. Alternatively the pump can become stretched and "baggy in which case it won't pump at all. The only solution is to replace the diaphragm.
- Also the one-way reed valves (which are just flaps forming part of the diaphragm) can become stuck to the surfaces of the tank/carburetor due to gum deposits if fuel is left lying in the tank over winter. This is why it is important to run a mower dry before storing for long periods, and add a fuel stabilization product such as STA-BIL to gas to keep it fresh. Also ethanol in fuel attracts moisture that can be detrimental to carburetors and steel fuel tanks, causing corrosion over time and requiring a carburetor re-build.
Checking a Pump-and-Weir Carburetor on a Briggs Engine

First remove the air filter.
© Eugene Brennan
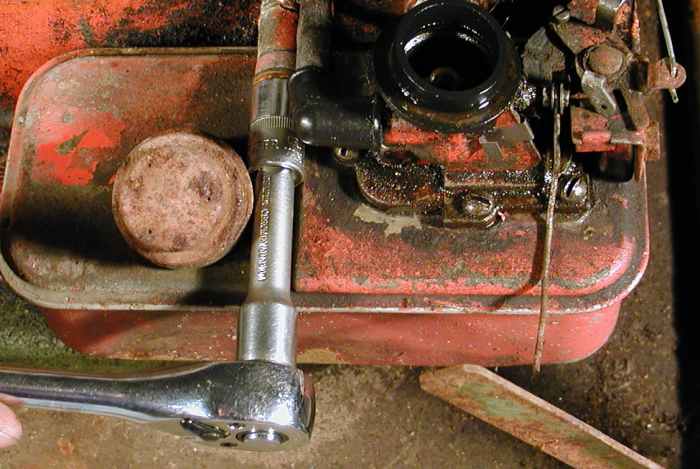
Undo the bolt holding the tank to the engine.
© Eugene Brennan
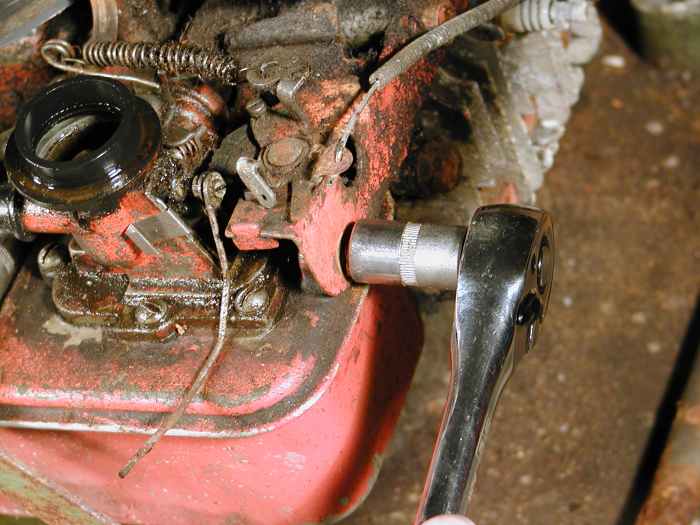
Undo the second bolt holding the tank.
© Eugene Brennan
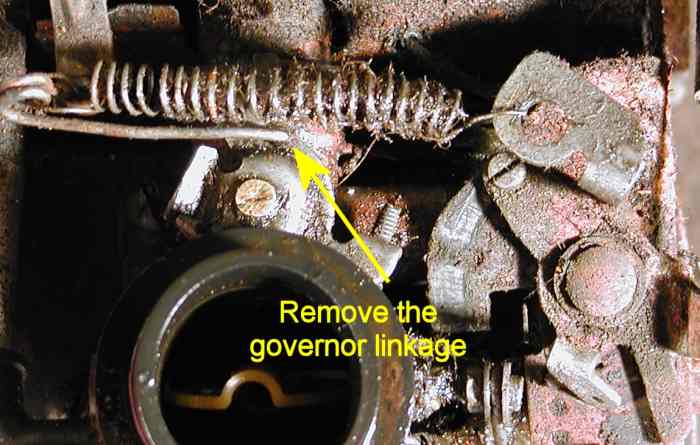
Remove the governor linkage.
© Eugene Brennan
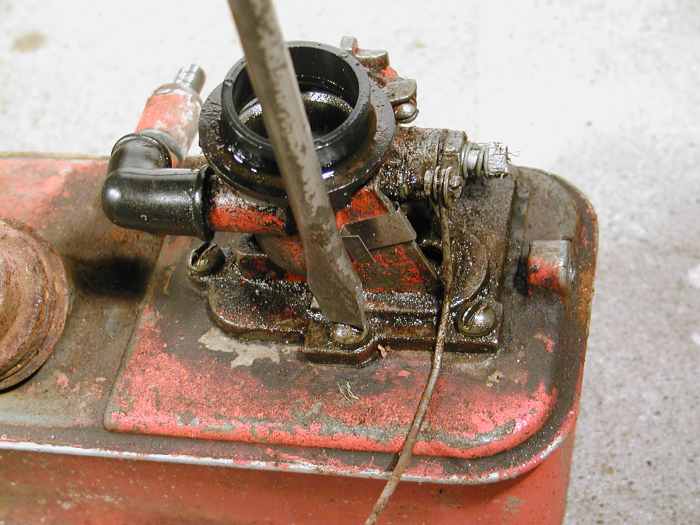
Undo the screws holding the carburetor to the the tank.
© Eugene Brennan
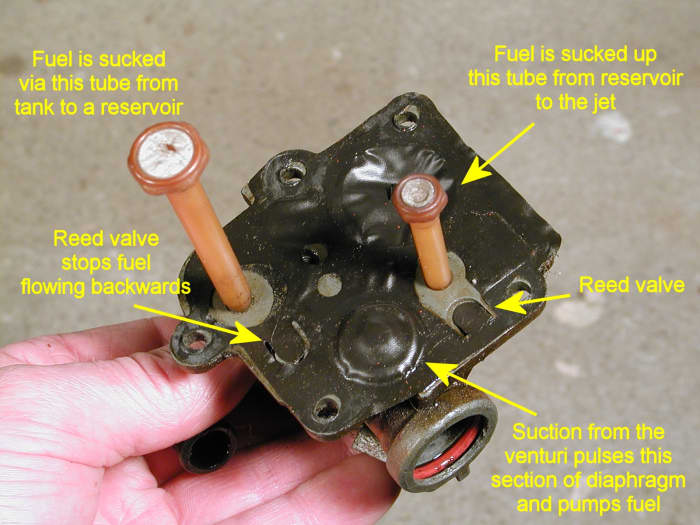
Parts of the diaphragm and carburetor. Newer models have a primer button for sucking up fuel. Check any associated one way valves are clear. Make sure the filters on the end of the tubes aren't clogged.
© Eugene Brennan
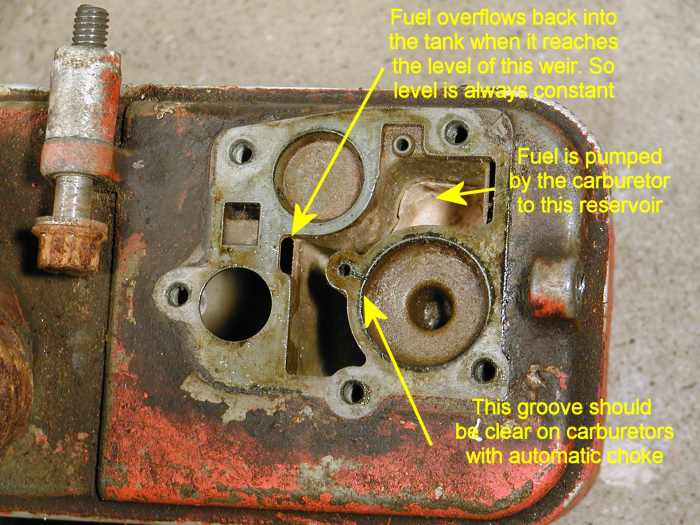
How the parts of the tank are used.
© Eugene Brennan
Automatic Choke
The carburetor in these photos has an automatic choke. Upon engine start-up, the choke is held closed by a linkage attached to the diaphragm membrane. Once the engine starts, low pressure in the carburetor venturi sucks air out of a small depression in the tank via a small channel. Because the channel is narrow, this takes time and the drop in pressure in the depression pulls down on the diaphragm membrane and opens the choke after a delay of a few seconds. Any deposits clogging this narrow groove could prevent the choke opening on startup.
Punctured Diaphragm
A punctured diaphragm has symptoms that include a lack of response when the mixture screw is turned clockwise, and also the engine continues to run even when the mixture screw is fully tightened all the way clockwise. The engine will run erratically, splutter, and misfire due to excessive fuel, and there may also be black smoke. The diaphragm normally becomes worn and punctured in the circular section which pumps the fuel. You can check for holes by holding it up against a bright light or the sun. The only solution is a replacement part.
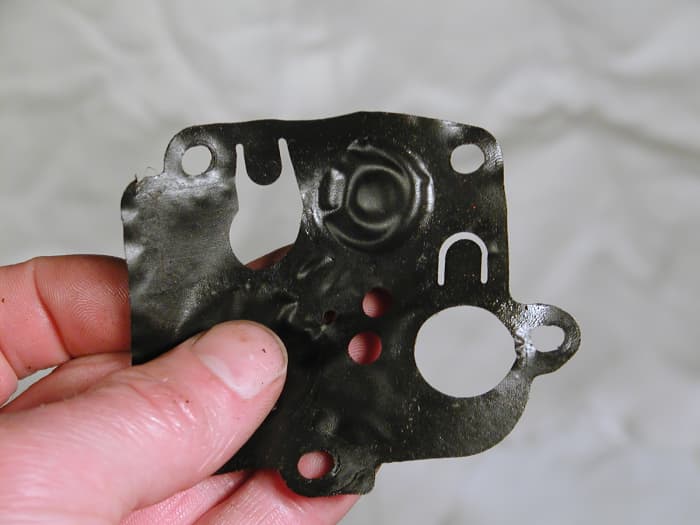
Clean the diaphragm and check it's free of holes by holding up to a light source. The pump section can become stretched and "baggy," lessening or preventing it from pumping. So it may need to be replaced.
© Eugene Brennan
Adjusting the Fuel/Air Mixture
Another cause of difficult starting is an incorrect fuel/air mixture ratio. The carburetor's function is to mix fuel and air into a mist, which then gets sucked into the engine to be burned. A mixture screw adjusts a needle valve/jet, which controls the flow of gas so that the air/fuel mixture is optimized, maximizing the power output (on some engines there is no adjustment screw and the mixture is factory set). The jet works exactly the same as the nozzle on a garden hose, producing a fine spray of gas particles. Unless someone has turned this screw since the last time you used your mower, this is unlikely to be a problem. However, sometimes grime or gum can clog the valve. To adjust the mixture:
- If you're not sure whether the screw was fiddled with, turn it fully clockwise and then unscrew 1 1/2 turns counter-clockwise.
- Allow the engine to run for five minutes until it is fully warmed up.
- With a flat screwdriver, turn the screw clockwise, 1/4 turn at a time, pausing for about 5 seconds after every adjustment, until the engine begins to stall. Do this gently because if you overdo it and screw the jet tightly into its seat, there is always the danger of damaging the soft tip on the needle valve.
- Now, repeat this procedure, but this time turn the screw counter-clockwise until the engine begins to stall again.
- Finally, set the screw midway between the two stall positions. If the mixture is too lean, this can cause a phenomenon called "hunting" where the engine goes "brmmm brmmm brmmm" and speeds up and slows down repeatedly. Hunting can also be caused by a stretched governor spring or clogged carburetor restricting fuel flow. A lean mixture causes an engine to run excessively hot and "spit." If the mixture is too rich, symptoms are black smoke and a smell of unburnt gas.
- Make sure any fiber or rubber seals on the shaft of the mixer screw are in good condition. If they seal badly, it reduces the ability of the engine to suck in fuel.
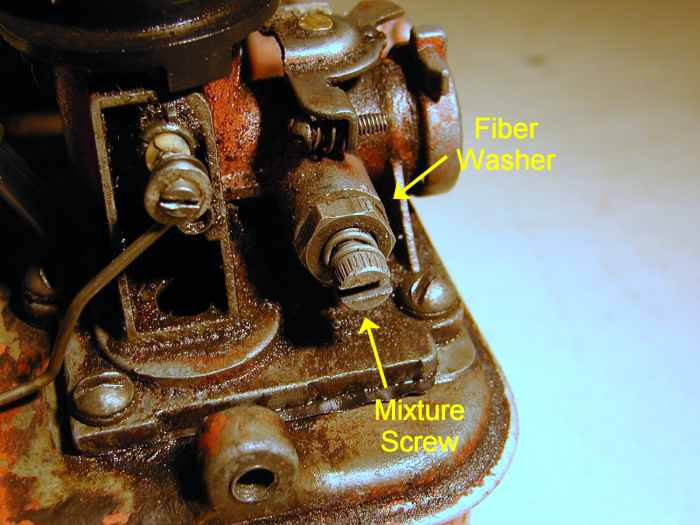
Mixture adjustment screw.
© Eugene Brennan
Fuel Pumps
Small engines use a simple gravity feeding system to fill the float bowl. Larger engines, such as those on lawn tractors, require a greater flow rate of gas. Also, the gas tank may be located lower than the carburetor. So a fuel pump may be required. These pumps can be electric powered, use a rod from the camshaft to operate a diaphragm in the pump or rely on the suction in the carburetor via a hose to operate the diaphragm (a diaphragm is a disk of flexible material pushed backwards and forwards to pump fuel).
Typical faults in pumps are a loss of voltage to the pump, a clogged filter in the pump, disconnected air hose, punctured diaphragm, or the seizing up of components of the pump.
Low Oil Level
Larger engines with an electrical system sometimes have a low oil level float switch. This prevents the engine from being started and damaged if the oil in the sump is below a threshold level.
Engine Compression
While fuel and a good spark are essential for an engine to start, good compression is also important. Compression is simply the ability of the fuel/air vapor to be compressed in the cylinder—also known as the combustion chamber—by the piston prior to ignition, without leaking out somewhere due to bad sealing.
You can get a rough idea of compression by sticking your thumb over the hole into which the plug screws and pulling the starter cord or turning the flywheel if this is easier. You should be able to feel the pressure on your thumb. However with the spark plug back in place, if compression is severely compromised, the starter cord will be easy to pull, with no resistance.
Bad compression can have several causes:
- Loose Spark Plug. It could be as simple as a loose spark plug, so tighten it up. Don't use excessive force when tightening.
- Bad Cylinder Head Gasket. The cylinder head is the piece of the engine into which the plug is fitted. This is bolted onto the cylinder block with the gasket sandwiched in between. You may notice burn or soot marks around the edges of the gasket.
- Bore Wear. Another cause of bad compression is bore wear, causing the piston to seal badly in the cylinder. This can happen as an engine reaches old age, or if it has been run without an air filter, or on low oil.
- Stuck Open Valves: Backfiring and Spitting. Another cause of bad compression is a stuck open or badly seating valve. During the 4-stroke cycle, an intake valve opens and allows air/gas mixture to flow into the cylinder, and an exhaust valve opens to allow burnt gases to be expelled from the cylinder. During the compression stroke, both valves should be closed. Now if the valves don't seat and seal fully due to wear, build up of deposits, or the exhaust valve becomes burned over many years of engine use, compression can suffer. Another scenario is if an engine comes to a standstill with one of the valves happening to be open. If the engine is stored for years without use, what can happen is that the valve seizes in this position. Now, normally, a camshaft opens each valve via rods in contact with the valve stems called tappets, and a spring returns the valve to the closed position. If the valve gets stuck, the spring force isn't strong enough to return the valve to the closed position. Symptoms of a stuck or badly worn valve can be spitting or backfiring through the carburetor or exhaust without the engine starting up, or the starter cord being really easy to pull. So the moral of the story is to "exercise" machines in storage every so often to prevent this happening. This can be as simple as pulling the starter cord of the engine gently so that everything internally moves. This applies to anything with moving parts including engines, motors, tools, and workshop equipment.
I actually experienced a compressions issue with my mower this morning even though it isn't terribly old. The cord was easy to pull with no resistance, so I assume a valve got stuck. After leaving the engine for about an hour, the problem resolved, maybe because oil worked its way into the stuck tappets or valve stems.
By looking into the cylinder through the spark plug hole, or removing an inspection cover over a compartment (known as the valve chest) which provides access to the tappets, you will be able to see whether a valve is sticking open. Some engines have OHV or overhead valves, and again access is possible by removing an access cover. Valves can be freed by spraying WD40 into the valve seat and onto the stems. However, this may be beyond the ability of the amateur. If the cylinder head needs to be removed, on replacement, bolt tightening should be in a staggered sequence and bolts should ideally be tightened back into place with a torque wrench.
Spitting can also be caused by a mixture which is set too lean, requiring the mixture screw to be turned anti-clockwise to richen it (see procedure above). Another cause of spitting is a sheared flywheel key, causing the timing to be off and the spark plug to fire at the wrong instant.
Starter Motors and Flat Batteries
Ride on mowers and some of the newer walk behind self-propelled mowers have batteries for easy starting. Battery voltage should be at least 12 volts and typically 14 volts when the mower is running and the battery is being charged by the alternator/dynamo. This guide shows you how to check voltage with a multimeter:
How to Use a Multimeter to Measure Voltage, Current and Resistance
Smoke Is a Tell-Tale Symptom
The color of smoke from the exhaust is a tell-tale symptom of problems with an engine.
White or blue smoke?
This is caused by oil being burnt in the engine. While a certain amount of oil is consumed and burned under normal circumstances, clouds of blue smoke indicate a problem. Old engines emit smoke as the cylinder wears (bore wear) and the piston and rings no longer fit so well. Excess oil gets up into the cylinder and is burned. Fractured piston rings can allow lots of oil to get into the cylinder.
Burning oil can also be caused by a faulty breather allowing oil to get blown out from the sump and then sucked into the engine via the carburetor (if there is a tube linking the breather to the carburetor).
Yet, another cause is an over-filled sump. On one occasion, my neighbor and her helpful friend decided to top-up the mower with oil, and being generous, they decided to fill the oil to the brim of the oil fill plug. The result? Thick clouds of white smoke which I could see in the distance! Yours truly had to save the day and drain some oil out of the mower!
Black smoke?
Black smoke is an indicator of too much gas being burned. This can be caused by an over-rich mixture (adjust the mixture screw), a faulty or punctured diaphragm in the carburetor, a choke not opening when the engine starts or a dirty air filter.
Throttle Linkages and Governor
A cable runs from the throttle control on the mower's handle to the governor mechanism adjacent to the carburetor. The governor varies the angle to which a valve in the carburetor (called a butterfly valve or throttle plate) is open or closed, controlling engine speed.
- Check that the throttle cable is actuating the butterfly valve via the linkages. These can sometimes get seized or obstructed by grass or small twigs.
- Ensure that the governor linkage isn't keeping the throttle closed. A governor is a device that regulates the speed of an engine, keeping it constant independent of the load on the engine. On a lawn mower, two types of a governor are used. One system consists of a vane pivoted at one end and connected to the butterfly valve in the carburetor via a spring and linkages. Air is directed from the fins on the flywheel onto the vane. If the engine slows down (due to long grass), this reduces the force of the air on the vane. This allows a spring to open the butterfly valve further, letting more fuel into the engine, giving more power and this increases the speed to compensate. The governor also limits the engine from over-revving by closing off the throttle when the load is reduced. Another type of governor works by centrifugal force. A spool that is able to slide on a shaft is acted on by arms which move further outward as engine speed increases. The spool actuates the throttle via linkages.
- With the air filter removed and using a torch, you can determine the position of the throttle and choke valves. These are plates which open or close in the intake. The outermost plate is the choke which almost fully obstructs the airway when turned on during a cold engine start. The throttle plate creates least obstruction on full throttle and the governor linkage shouldn't be closing it before the engine starts. Check that the governor can move freely and isn't sticking.
Governor Vane and Linkages
Don't Try Starting an Engine Without the Blade!
Small engines, such as those on lawn mowers, usually have an aluminum flywheel, and the added weight of the blade actually forms part of the flywheel system. If you are familiar with mechanics (a branch of physics), you will know this increases the moment of inertia of the system. If the blade is removed, it will be difficult to start the engine because of insufficient spin momentum when you pull the starter cord.
Routine Mower Maintenance Checks During the Summer
- Check oil every month or more regularly depending on usage.
- Remove any grass or leaves from the cooling fins on the cylinder head. Air blown through the fins by the flywheel conducts heat away from the engine so its important that they are not clogged.
- Sharpen the blade a few times during the season, again depending on usage. If you have a small lawn, a single sharpening at the start of the year should be sufficient.
- Check for any loose nuts or screws on wheels or other parts of the mower.
- If possible, drip some light machine oil onto the control cables for the throttle and drive. If you do this a little at a time, it will run down along the cables into the cable sleeves, preventing corrosion and seizing.
- Try to avoid cutting grass when it is wet. Wet grass clippings stick to the underside of the deck along with mud and other grime. This clogs the pathway to the collection bag and eventually the engine can struggle while cutting. After use in these conditions, wash the underside of the deck with a hose, but try not to get any water up onto the engine and air filter.
Winter Storage of a Mower
- Change engine oil. Ideally you should change oil at the end of the season before combustion products have a chance to settle out or stick to metal surfaces. Also acidic combustion products such as sulphur and nitrous oxides in lubricating oil can cause corrosion over winter. You can read how to do this in my guide here:
How to Change Lawn mower Oil - If the carburetor bowl has a drain plug, turn off the fuel tap first, then loosen the plug to drain fuel into a container. Alternatively if this isn't possible, to prevent starting problems next season, run the mower until it cuts out from lack of fuel. This should clear most of the fuel from the carburetor and bowl and help to prevent everything gumming up.
- To prevent corrosion, let the mower cool down, remove the spark plug and put a teaspoon of oil through the plug hole. Pull the starter cord gently a couple of times and replace the plug. Remove all caked-on grass from the underside of the deck as this can ferment, become acidic and eat its way through the metal over time.
Buying a New Mower
If you can't get your mower started, maybe it's time to buy a new one! Check out my guide to Choosing and Buying a Lawn Mower which discusses the pros and cons of electric, gas, and battery models.
My Personal Experience With Lawn Mowers
I don't fix lawn equipment professionally, but I learned all this stuff by messing around with engines since I was a teenager, and have gained about thirty years experience with lawn mowers, string trimmers, and hedge cutters.
This article is accurate and true to the best of the author's knowledge. Content is for informational or entertainment purposes only and does not substitute for personal counsel or professional advice in business, financial, legal, or technical matters.
Questions & Answers
Question: Why would a lawn mower start and then stop?
Answer: The obvious thing to check is that the mower hasn't run out of fuel. Try starting again and check that you have a spark. Dirt or water in the float bowl can cause spluttering, and the mower may stop. If the ignition coil fails, the engine will stop suddenly (This happened to me a few days ago). In this event, the coil will need to be replaced.
Question: My Husqvarna, which has only been used once or twice, has a 6.25 hp Briggs and Stratton engine. It is an all-wheel drive. It was given to me. It will start, and if I manually choke it by using a finger on the carb intake, it will run. Otherwise, it cranks for a few seconds and then quits. It will run as long as I am choking it. It has no idle control, is in new condition, and is kept in the garage. What do I do?
Answer: Sometimes at the start of a season, an engine will struggle to start because the carburetor is empty of fuel. Make sure that you follow the engine startup procedure in your manual, or as outlined in the article above, and set the throttle control into the choke/start position if there is one. If the engine has a primer button, it needs to be pressed about eight times, or as recommended in the startup procedure. When the engine cuts out, try pressing the primer about five times again before you attempt to restart.
© 2012 Eugene Brennan
AndyMcJ on June 03, 2020:
Definitely not a blade issue, because you can't start the engine with the blades engaged. Also it is made to run either with the blades on or off. As for the flywheel it is made from Iron and is certainly heavy ;o)
Eugene Brennan (author) from Ireland on June 03, 2020:
If the blade isn't attached, this can be a problem. In the case of two mowers I had, the engine wouldn't start without the blade because it effectively works as a flywheel and is sometimes a necessary part of the engine. The engine flywheel itself, especially if it's made from aluminium, just doesn't provide sufficient moment of inertia.
You could ask on the Lawnmowerforum (just Google it, I'm limited to the number of links here) and see what they suggest. Let me know if it's a blade issue.
AndyMcJ on June 02, 2020:
In answer to your comments, the blades are not attached as the whole cutting deck has been removed to make it a ride on for towing a cart for yard work. There is an adjustment screw for the Air/fuel ratio, but I have been hesitant to mess with this as it comes pre-set based on the reviews from Amazon where I purchased the new Carb. I am leaning more towards it being a valve issue and I am going to take the valve cover off next and check them out. I would play with the air/fuel mixture adjustment once I get it running so I can hear the results of making it leaner or richer. I will keep you posted.
Eugene Brennan (author) from Ireland on June 01, 2020:
Check your float bowl and jets again. I had an issue with a new mower. It turned out that pieces of rubber, possibly from a gasket/O-ring had accumulated in the bowl. They must have been there since manufacture but had become dislodged during manufacture..
Eugene Brennan (author) from Ireland on June 01, 2020:
Are there any mixture adjustment screws on the carburetor?
Eugene Brennan (author) from Ireland on June 01, 2020:
It could be something more obscure like a problem with valves. I presume the blade is attached?
AndyMcJ on May 31, 2020:
I put the air filter back on and after several attempts it coughed and spluttered and backfired for about 3 seconds before stopping again. Still no luck, but a 5% improvement ;o)
AndyMcJ on May 31, 2020:
The fuel is not a problem, the fuel cap has no effect removed or on. All gaskets were new with the new carb, The starter motor has a spring on it that engages when it spins up and disengages when the motor starts. I will try putting the air filter on and see if that changes anything.
Eugene Brennan (author) from Ireland on May 31, 2020:
If a mower is run without an air filter, it changes the air fuel ratio because it sucks in too much air. So this can make it difficult to start.
Eugene Brennan (author) from Ireland on May 31, 2020:
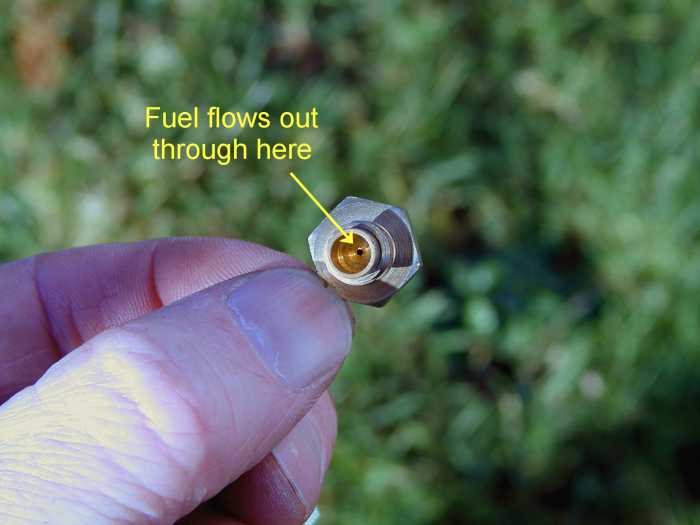
Andrew, have you tried removing the fuel line from the carburetor to check whether fuel flows freely? Is the float bowl filling ok? Did you try loosening the cap of the fuel tank and starting in case the tank isn't venting? Is the carburetor sealed properly to the engine with gaskets working properly and no air leaks? I wonder could the starter motor be loading the engine causing it to stall? I think some but possibly not all of these starter motors are dynastarters which means they switch to act as a dynamo and charge the battery once the engine starts. I'm not sure how they do the changeover, possibly when the pinion speeds up as the engine starts, voltage generated is greater than the driving voltage from the motor. Maybe a fault in this device could be loading the engine, acting as a brake and stalling it.
Eugene Brennan (author) from Ireland on May 31, 2020:
Hi Andrew,
You seem to have the air filter removed. What happens when it's in place?
AndyMcJ on May 31, 2020:
Great article, it has covered all the problem areas i can think of, but I still have starting issues, I have replaced the Carburetor as the original carb had a fault and would flood the engine, the oil was mixed with petrol from the flooding of the carb, so petrol went into the oil breather tube, so this was emptied and refilled with 5w-30 Synthetic, the spark plug was replaced with a new Champion plug of the correct type for the engine and a spark was strong when the engine was turned over with the plug outside the engine. I also took everything off the top to get to the flywheel to see if the key was broken, but that was perfectly inline and intact. I also checked the governor and this was working and set correctly. So I am at a loss as to why this engine will not start? I have a video to show the issue here: https://photos.app.goo.gl/movCzwkpx4EQ98wo9
XwhodeyX on April 14, 2020:
I must say, I am impressed with the article. Well done. My issue is a bit more specific, but I bookmarked this for a good source of basic troubleshooting
Lisa Morgan on August 21, 2019:
I used my Briggs & Stratton mower for the first time and made sure oil & gas was filled picked up all debris in yard. I mowed one strip and mower shut off. The pull string is very tight and so is the blade.
Eugene Brennan (author) from Ireland on August 09, 2019:
Hi Willie, all I can suggest is that you check all the normal things, plug is sparking ok, float bowl doesn't have any debris in it, jet is clear (use compressed air to clear it if you have a blow gun), clean the air filter etc.
WillieGrady on August 09, 2019:
my lawnmower won't start I put a new primer button on it but it seems still not turning over is not cranking can you help me
Eugene Brennan (author) from Ireland on July 31, 2019:
It's possible that the gasket isn't sealing properly or bit's of rubber have got into the carburetor and blocked something. Try taking off the bowl of the carburetor and see if there's debris accumulated in it.
Grant Stewart on July 29, 2019:
Hi Eugene,
I cleaned out my carburetor, cleaned my spark plug and replaced the air filter on my lawn boy mower which has a kohler engine. As soon as I put the carburetor back on, it started up fine and ran for a couple minutes just to test it before I shut it off. A few days later I went out to mow grass and couldn't get it to start at all. I'm not sure what could be wrong with it. The seal right behind the air filter housing looks pretty worn. Small pieces are coming off around where the threads go through
Eugene Brennan (author) from Ireland on May 31, 2019:
Hi Tony,
Sounds like a similar problem to Erics below. Checkout the link that explains it.
tony on May 31, 2019:
my mower started @ran good but something happened the part that
is weled to the sleeve that slides over the shaft it broke and the blade came loose and know it won t start.
Eugene Brennan (author) from Ireland on May 29, 2019:
Hi Eric,
There are two possible things that could have happened. The flywheel key (which stops the flywheel turning on the shaft) could have sheared as the flywheel tried to keep turning when the crankshaft and blade slowed down rapidly as the blade hit the rope. The other scenario is that the blade stopped and the crankshaft kept turning, shearing the key at the bottom of the shaft or destroying the inside of the blade carrier.
This explains it:
https://www.youtube.com/watch?v=ffd-_Ugg6oo
Eric on May 29, 2019:
I ran over a thick rope and it killed engine on mower. Well i got all the rope out fron around blades now the mower will not start. The mower has been used maybe 4 times. Someone please let me know how to get this mower started. Thank you
Philip 001 on May 23, 2018:
Eugene, the push rods do NOT move when the engine is turned. Although they are movable when I press the valve spring to take pressure off of them. I can see where this is quickly heading and- unfortunately, at this point- seeing that the cost of a replacement crankshaft is $150 plus shipping, my sense of economics says that I can pick up a new pressure washer for between $200 and $300 USD. I will just sell it to someone for ancillary parts at this point.
It was an interesting learning experience. I do appreciate your expert advice and time. Wish you the best.
Eugene Brennan (author) from Ireland on May 22, 2018:
Well, I would be the same as you and wouldn't like giving up on a problem.
I'll see if I can find an exploded diagram and have a think about it. In the meantime, you could post on Brigs's forum (I'll look for the link). They'll probably refer you to a service agent though.
Philip 001 on May 22, 2018:
Hello and thank you for you thoughts Eugene,
It is an OHV engine so, I removed the valve cover and rotated the flywheel to watch the valves. neither one is moving- at all. They are closed and yet move freely when I press them.
I removed the nut on the flywheel and removed the cooling fins to expose the shaft. The flywheel key is not sheared.
It is beginning to appear that something is wrong internally.
The piston moves and there is compression.
The valves and pushrods move freely when pressed manually.
it appears the cam is not rotating to activate the pushrods/valves.
I am about ready to scrap this project- if i just wasn't so determined to solve problems.
Eugene Brennan (author) from Ireland on May 17, 2018:
Hi Philip,
Hmm, seems like you're doing everything right. I just had to replace the magneto on my mower the other day, and although it wasn't totally identical, and mounting holes were in different positions in the core of the new one (actually off a scrapped engine, free, courtesy of my local hire shop!), I swapped the coil onto the old core and it worked fine. The experts on Lawnmowerforum reckon there's lots of different types and a mower may not run properly if it doesn't have the proper coil. Do you think you definitely have the proper part?
Did you check that the air filter is clean?
I would check the jet is clean in the carburetor, maybe blow air through it from an air compressor blow gun if you have one. What can happen is tiny bits of rubber from gaskets or the primer button (if there is one) , can get stuck in the jet. This happened to me once.
Is the inlet valve feeding the bowl shutting off properly (and opening ok)? To check this, I normally use a vice grips on the fuel line to shut off flow. Then I push up on the float, release the vice grips, confirm there's no flow, then let the float down to see if fuel flows.
I wonder could one of the valves be stuck open? You might be able to see them through the spark plug hole, by removing a valve chest cover or if it's an OHV engine, removing the cover over the valves.
Philip 001 on May 17, 2018:
Hello Eugene,
I have a BriggsStratton Engine Model # 11P902-0127-B1 on a Lowes brand pressure washer.
It was running last December. I did not completely drain the fuel system and in March went to start it again. It started up fine. I put it back in storage and went to start it a couple weeks later- nothing.
I checked the spark plug and spark. Spark plug was like new, but no spark. I ordered a new magneto and replaced it. Spark came back, but- still would not start. I could smell fuel vapor coming from the cylinder while the plug was out.
I took the carburetor off, and cleaned it and put it back on with new gaskets, drained the fuel, took of the tank and cleaned it. Fresh fuel. Still not starting.
I did notice the bowl on the carburetor was a bit dirty when cleaning so, I ordered a brand new carburetor, a filter and a shutoff valve.
I installed the valve inline next to the tank, then the filter, then the new carburetor and gasket kit.
I took off the pull start mechanism as my arm was getting tired and used a 24mm socket on the flywheel nut and my battery drill set on the low spin setting (450rpm) to turn over the engine.
clean oil at the right level, good compression, back flow tube from block to carburetor is connected, spark is good, plug gap is set correctly, magneto gap is set to .012", gas valve is on, fuel is flowing, clean air filter, kill switch is set to run (1).
Not even a hiccup of a ignition fire. I am pretty baffled at this point.
This is a two-year old, low hours engine with maybe a total of 8 to 10 hours of use.
What am I missing?
Pawel Z. on April 18, 2018:
Thanx for quick respons.
As I wrote in my last post, I disassembly my engine completly, also valves. It is flat head engine, so I can see valve movment during start, if I romove small cover on the side of engine. Valves are clean, and work really arrording cam shaft. The problem is that during compresion stroke, even in slow manual movment, the intake valve is not fully closed. There is very thin gap, and it is gone as soon as piston reach TDC. This is my doubt, I have never met such construction in car engines. I thought it can be some kind decompresion solution, in high RPM the time when intake valve has this gap is so smal, that it does not metter. But if I'm wrong, my compresion rate 100PSI is bad, good, or very good?
Eugene Brennan (author) from Ireland on April 18, 2018:
Hi Pawel,
A friend had a problem with a lawn mower tractor once. The engine continually spit and backfired and it turned out that the exhaust valve was stuck open. We freed it by removing the cylinder head and spraying WD40 down under the open valve and it loosened the valve stem.
If you can feel under pressure and over pressure, it sounds as though the intake valve is partially open at least, and the over pressure occurs when mixture is pushed back out the valve during the compression stroke.
Is there a valve chest that allows you to view and access see the stems of the valves and tappets/pushrods? A spring returns the valve to the closed position. I'm not sure whether this is the case with all engines, but if there's a gap between the tappet and valve stem and the valve is open, it could be sticking and the spring not pushing it closed.
Pawel Z. on April 18, 2018:
Hello Eugene
I try to find solution to start my MTD tractor with B&S 13PS flat head engine.
On the end of last summer the engine had stoped with black somke. As you mention in your advises the air-fuel mixture was to rich. I cleaned the carburator, but motor was still dead. During winter time I focused on the issue, and found out, the compresion was very low, arround 3 bars. In that case I decided to disassembly whole engine. Piston rings was exchanged, valve job done with clearence, all seals new. After this actions the compresion is 7 bars (100PSI), there is new spark plug, no problem with spark, and engine still does not starts. What I found during diferent tests, is that if ther is no carburator, and I start engine suppling it with fuel by manual jet, I can see that te fuel is blowed out back via intake manifold. If I put my hand to manuifold, I can fell underpressure and overpressure, one after the other. Is it normal? One addiltionat remark, I can see very smal gap on the intake valve during compresion stroke. It is fully closed after TDC. based on my knowledge it is not OK, but I can't imagine that cam shaft is getting bigger during running????? Have you had similar case in the past? What do you think about it?
Eugene Brennan (author) from Ireland on September 08, 2017:
LOL Mike!
That's a new one! Anyway glad you found out what was wrong. I would never have thought of that in a million years!
(Actually I might add this to the troubleshooting check list above).
Mike P on September 08, 2017:
Hi Eugene,
I found the problem with why my mower would not start - what i thought was new clean petrol was instead (less inflammable) diesel that my girlfriend had mistakenly filled the jerry can with!
Thanks for your help
Ian on September 08, 2017:
Thanks Eugene for the time and attention you have put into this article. Would you know where I can find the engine model number for my old 3.5HP Briggs & Stratton?
Thanks
Eugene Brennan (author) from Ireland on September 07, 2017:
Hi Mark,
A bad seal would lessen the engine's ability to suck fuel into the engine.
I wonder is there oil lodging somewhere in the carburetor since the mower was turned on it's side? There are Welch plates on some carburetors which can be removed (they cover holes/passageways which were drilled in the carburetor during manufacture which couldn't be created in the cast). Unfortunately these plates have to be replaced after removal. However there was no improvement when you tried a new carburetor, but there could be some other reason why that didn't work (troubleshooting seems simple but isn't always!).
Have you tried blowing carb cleaner up into the jet of the carburetor to see whether it emerges ok into the venturi? It sounds as though the carb just isn't sucking fuel properly. I'm not quite sure how the float bowl is vented to the atmosphere or whether it even needs to because fuel flowing in replaces fuel flowing out. If air can't get into the bowl as fuel leaves, the drop in pressure in the venturi won't allow fuel to be sucked into the airflow. (like trying to empty a bottle or barrel which isn't vented). Possibly this vent/passageway is filled with oil. I need to do some research on this (or you can if you like!). Search for "carburetor bowl venting on lawn mower".
Mike P on September 07, 2017:
Hi Eugene,
The electrical system appears fine - testing the plug held against the mower body I see a spark plus it will start and run for 2 or 3 seconds if I spray carb cleaner through the carb choke plate inlet.
The compression seems okay also as I feel plenty of pressure holding my thumb against the plug hole.
The linkages are also working okay - the choke activates in the choke position and the throttle link is moving back and forth.
If I spray carb cleaner into the spark hole and pull the cord it sprays the carb cleaner back out the hole - this is why I figured I should see spray that has come from the carb by pulling the cord. I've since checked this by sticking a bit of kitchen towel through the choke inlet into the venturi to confirm that it gets wet so the carb appears to be doing its job.
Note: further background on the problem - the last time that the mower was used it was tipped on it's side the wrong way which soaked the air filter - after which it was run for about another hour on the same day with the choke on (to finish mowing the lawn) as it would die if moved from the choke position to the run position. It was when replacing the air filter a few days later and trying to start it that I found it would not start at all anymore, at which point I pulled the carb off and proceeded trying things as per below.
I can't see why the mower is not running if even really badly - could bad seals between the carb and the cylinder stop it from starting at all?
Eugene Brennan (author) from Ireland on September 04, 2017:
Hi Mike,
I don't think I've ever seen anything coming out the spark plug hole, but that's probably because it was on the opposite side to the starter cord.
Is the mower sparking ok? Have you tried a new plug? The ignition module could be giving trouble and internal insulation breaking down.
How is compression? You would need to put your thumb over the plug hole while an assistant pulls the cord. There should be definite pressure on your thumb.
Are the linkages to the governor moving ok so that the throttle plate opens?
Mike P on September 04, 2017:
Hi, I have a Honda HRB425C mower that won't start.
If I spray carb cleaner into the carb then the mower will start for a second or two. I've checked the fuel line which is fine and the carb bowl fills with fuel.
I've tried pulling the carb off and cleaning it (as per various youtube videos) which has not worked. I've tried a new carb (non genuine part) plus new gaskets (and new air filter) except for the guide comp plate with attached gaskets (19650-ZM0-000) which looks fine and for which I don't have a replacement. As far as I can tell I've installed the gaskets correctly with the air intake holes in the correct positions.
If I take the spark plug out and pull the starter cord I don't get any mist coming out of the spark plug hole (not sure what is normal to see coming out though).
Any ideas?
Eugene Brennan (author) from Ireland on June 02, 2017:
I cant think of anything else Waseem. Is it sparking ok? If it has a float bowl type carburetor, check it's filling ok and that the inlet valve shuts off. Check the jet is clean also.
Waseem007 on June 02, 2017:
HI Eugene . Thanks for your earlier advice. I have tried the above points you mentioned however its still not working. Is there anything else i can do before refering it to the proffesional???
THanks
Eugene Brennan (author) from Ireland on May 29, 2017:
Remove the air filter and check it isn't fouled with oil. If the filter is paper and soaked in oil, it should be replaced. Foam filters can be washed in hot water as described above. Check there's no oil in the air intake to the carburetor. You can tip the mower at an acute angle, about 20 degrees, to drain any oil which may have collected in the carburetor. If you've repeatedly pulled the starter cord, you may have flooded the engine, so leave the mower for a while and if possible take out the plug to allow excess petrol to evaporate.
Waseem007 on May 29, 2017:
Hi
I have got mountfield petrol lawn mower. Acidentally i tilt it to the side and now it wont start. I have changed a spark plug, oil and new petrol but it still wont start. Any help please?????
Eugene Brennan (author) from Ireland on May 19, 2017:
Hi Mark,
Take a look at this manual, it may show the linkages for your carburetor:
https://drive.google.com/file/d/0B6N...s3Z2Q2X00/v...
Mark Harrison on May 18, 2017:
Hi Eugene,
Thank you for your assistance. I am hoping to make some progress this weekend.
Regarding the carburetor, I took out the bowl screw and caught the dirty fuel, but the bowl didn't drop off as expected. I didn't try to force it off at the time, because I didn't have a kit or gaskets to service it further. Do you think it should be serviced (because of the dirty fuel) and if so, is the bowl threaded? How does it twist off?
Have you had any luck finding a photo of the linkage part? Thanks again.
Eugene Brennan (author) from Ireland on May 15, 2017:
Hi Mark,
Carburetors vary somewhat in design. The one on my Tecumseh engine has a bowl nut with an intake hole. Fuel flows in through this hole and out through a jet inside the nut and then via a nozzle into the carburetor. On some carburetors, the bowl nut has an additional small hole through which fuel is drawn when the engine is idling. Your carburetor must be drawing fuel in through an alternative route.
If the mower struggles/stops in long grass, it may because the choke is semi-closed/closing causing a reduction in power, or maybe the governor isn't working properly so the throttle doesn't open to compensate for the increased load.
I've forwarded your query to Briggs & Stratton to see whether they have a photo showing the linkages for this specific engine, which would be better than the exploded diagram in the parts manual. In the meantime, I'll see if I can track down a photo myself.
Eugene Brennan (author) from Ireland on May 10, 2017:
Hi Jerry,
I haven't come across this problem before, so here's some speculation!
720 degrees corresponds to 2 turns of the crank shaft so it seems as if something is sticking or reluctant to move every 2 turns. This sounds like there's an issue with one of the valves.
Just to be sure there isn't oil in the cylinder causing a hydraulic lock (i.e. oil won't compress or squeezes slowly back by the piston rings) during the compression stroke, remove the plug and see if that improves matters.
The push rods/tappets which operate the valves may be bent. Alternatively either of the valves or push rods may be rusted or gummed up with varnish so they don't slide easy. If you remove the cover over the valves, you should be able to see which one isn't moving. On an OHV engine, removing the cover exposes the valves, push rods and rocker arm. On a side valve (flat block or l-block) engine, there is usually a plate which can be removed which exposes the valves. Ideally valves should be removed and cleaned. (which is a rather involved job, requiring the cylinder head to be removed!) You could try to use penetrating oil e.g. WD40 and to spray it down onto the valve stems and see if that solves the problem.
Hope this helps!
Jerry Walker on May 09, 2017:
Hello Eugene thank you for the article, it is very informative.
I was scrolling and scrolling looking at everything and I thought to myself Eugene really really really really wants me to scroll to the end.
Alas, my problem is not addressed here. Engine and crank shaft and blade assembly exhibits a marked resistance to turning every 720 degrees, when I get back to that point it takes a lot more Force to get it to rotate 45° then it gets through that difficult part and rotates normally the rest of the 1 and 7/8 rotation of the blade assembly. Which means that when I tried to pull it with the starting ripcord it's very difficult and it never gets going fast enough to even try to start, so there is something physical going on inside. If this would cost more than, say, 20 American dollars to fix then I should probably just get rid of this mower and buy a new one. What do you think?
I bought the mower brand new, yes, that's potentially a plus. But it was about six or seven years ago so the whole thing is now that old so that's potentially a minus. But despite that everything else is still extremely sturdy as if it had aged well, appearing to be an extremely good condition the Killswitch is perfect the cable for the kill switches perfect the ripcord is fine, so that's, again, a potential plus. But if this problem is internal and involves something physical to the inside of the engine I think that would spell m-o-n-e-y and would also spell not-financially-viable-to-repair and would change the outcome of the repair vs replace question to replace. Do you have any thoughts? Thank you so much, both now and in advance!
Jerry (Walker)
H Michael on May 02, 2017:
Thanks so much for the insight. The battery cost more than what I paid for the mower, so if won't run without it I will just use it for parts.
Thanks again!
Eugene Brennan (author) from Ireland on May 01, 2017:
Warning! Some newer engines use lithium ion batteries for electric start. Never try to charge these with a conventional lead acid charger. When replacing batteries, remove the fuse in the harness cable first, then disconnect the battery cables.
Eugene Brennan (author) from Ireland on April 30, 2017:
Hi H,
I'm out of my depth as regards electric start mowers, but the batteries are normally gel, lead acid types with a typical capacity of about 20 AH. You could buy a three stage charger suitable for this capacity battery (or whatever's marked on it) and ideally charge it while it's disconnected and removed from the mower or alternatively with the cables to the engine disconnected and the battery in place. If you do that, it's vitally important to avoid croc clips touching the chassis of the mower. However the chances are that the battery is permanently dead, meaning a replacement. Make sure the cables are connected/disconnected with the charger unplugged to avoid sparks.
See if you can get the engine cranking a few more times with the spray. This should warm it up so that it is less reluctant to start.
Check again that the float is working ok, the bowl is filling, there is no debris in the bowl and the jet is completely clean. Spray carb cleaner into the jets to remove any stufff that could be clogging them up.
H Michael on April 30, 2017:
This is one of the best small engine instructional sites, doesn't overwhelm a novice.
I just bought a used (one season) craftsman self propelled, electric start 675 platinum mower at an estate sale. I was told it had been in storage for two years (looked like new, guess that sucked me in), and that the charger for the electric start had been lost. But was assured it would work with the pull start. Well, so far it doesn't (caveat emptor).
I have a basic knowledge of older Briggs and Stratton engines from my teens but now a senior citizen, just like cars and phones, I'm behind. I put in fresh oil and gas and replaced the spark plug but it would not start. I then checked to see if the plug sparked, checked fuel line and compression, still wouldn't start. I removed the carburetor, cleaned it, checked jets, seals, float and air filter but no luck turning over. I did use a spray of starter fluid and it would briefly crank. Since it doesn't have points, primer bulb or throttle anymore, I've reached the end of my small engine knowledge.
Could a completely dead battery on this type mower have anything to do with it? I don't have a clue of what to do next except count my losses, can you give me some direction? Thanks!!! Comment...
Eugene Brennan (author) from Ireland on December 03, 2016:
Hi Paul - How do you know the spark plugs are definitely blown? Usually a plug will either end up with worn electrodes or possibly an internal crack in the plug can cause the electricity to take a short cut inside the plug. An integrated EMI preventing resistor inside the plug could also get shorted out. Do you get a spark across the gap of the plug when it is removed from the engine? It could be the electronic ignition is working intermittently or there's a problem with connections/cabling. Check your cabling first and make sure the plug lead is pushed firmly into the plug boot. Try some more plugs and test them for a spark before inserting in the engine. If you're certain the ignition is at fault, here's a video on replacing the coil (not specifically on a GXV160, but the procedure would be similar).
https://www.youtube.com/watch?v=yMTUx01X_hk
Paul on December 02, 2016:
Hi great article, wonder if you could help me I have a Honda GXV160 5.5hp on my Honda HRH536 QXE Pro lawnmower and after the spark plug was tested fine I pulled the starter pull cord to try and start the mower it would only start on carb cleaner so i replaced the carb with one i knew was good then it would try to start again on carb cleaner but then nothing and no spark so i removed the spark plug and find it had blown, so i replaced and try again and same again it blows the spark plug any ideas anyone? Every time it just blows the plug
Eugene Brennan (author) from Ireland on August 26, 2016:
If there was a pin hole in the float it would eventually sink, allowing fuel to rise in bowl, eventually flooding carburettor. You could try looking into carburetor before starting to see if this is happening. Check also that plug isn't sooting up due to excess fuel and stopping the engine.
Does the engine work ok and run for 15 seconds after it's left for a period? This would indicate that fuel isn't filling the bowl and it gets used up, however you say that the bowl is full.
What sort of choke does it have and is it turning off ok?
After the engine cuts out, will it start again and run for a further 15 seconds? Could be something in the ignition module breaking down when it gets hot.
Is oil level ok and does blade turn ok? (don't forget to remove lead and/or plug before turning). I'm currently working on an engine which runs for about 15 seconds and then stops. Turns out the "splasher" on the connecting rod which throws oil around the inside of the engine had broken off. So connecting rod/crankshaft gets hot and seizes, stalling the engine when it runs for even a short period.
dave on August 25, 2016:
Hi Eugbug, ty for the prompt reply. Have plenty of fuel running through ,no jets blocked,needle & seat ok. No primer fitted , fuel bowl clean. Air filter looking a bit ratty. I have test run the engine in the past without air filter fitted and it ran ok without it. I had just put it all back together again and i realised that i didn't check to see if the float had a pin hole or some sort of leak i wonder if that could be the prob. I've run out of time for now, i will check that tomorrow.
Eugene Brennan (author) from Ireland on August 25, 2016:
Hi Dave, is the float bowl definitely filling? The bowl may be full when you check it, but it could be filling very slowly so that it empties once the engine runs. Remove the bowl while holding a container underneath to catch the petrol. Check that it flows freely, if not you either have a blocked fuel filter or inlet valve to the bowl. Check also that there is no debris floating about in the bowl which would clog the main jet. If the engine has a primer, check that fuel is getting up into the carb if you press it a lot. You may be able to see this if the air filter is removed.
dave on August 25, 2016:
Hi i have pope spitfire 4 stroke . Engine starts runs great for 15 seconds then just stops. i have cleaned the carb no probs. getting fuel ok.any cut out wires have been disconnected long before i had any probs.fuel new and no water,plug new and sparking great any ideas as to why it keeps stopping?
Eugene Brennan (author) from Ireland on August 24, 2016:
Hi Sandra, follow the starting procedure above andor the instructions which should come with your mower. If it's a push mower, you may have to prime it before starting. Usually there's a push button near the fuel tank which you have to push and release 5 or 6 times before you pull the starter rope. If the mower is new, it should of course be on warranty and you may be able to get telephone support from the retailer/manufacturer.
Sandra dunn on August 24, 2016:
My husband bought the mower new,and it just wont go
Eugene Brennan (author) from Ireland on June 18, 2016:
Hi Vikas. Basically you need to use a continuity checker to trace the wiring and make sure power is getting to the motor. I would start with the plug and check whether there is continuity between the hot/live pin and where the power enters the motor. Do the same for neutral. Then you can determine whether or not there is a break in the conductors. Possibility the push button is at fault but there could also be a break in the windings of the motor. If there are just two wires coming out of the motor, check that you have continuity between these wires. You can buy a continuity tester, but it would be more useful to buy a cheap multimeter. These have continuity and resistance ranges as standard.
vikas on June 18, 2016:
hi
i bought a old electric lawnmaster mower .it is push button start .
It is refusing to start . i have checked the extension cord , air vents ,blade for movement and debris etc . All the wire coming out of motor are ok . Even the carbon brushes are ok .
what more should i check
thanks
Eugene Brennan (author) from Ireland on May 22, 2016:
Hi Deb, thanks for that! Do you mean the red cowling which covers the top of the engine? It's possible if the engine was given an oil change after you bought it, that some oil was dribbled on the cowl. This would become more noticeable over time as dirt sticks to it. Is it definitely oil? Maybe someone spilled something on it or possibly it could be tree sap/resin if the mower is stored under trees. This stuff is apparently honeydew produced by aphids, and has a sticky consistency like honey (see link: http://auto.howstuffworks.com/under-the-hood/vehic... If the engine was leaking oil, it would be more likely to drain downwards or maybe coat the underside of the cowl or side of the engine if there was a leak through the breather. Make sure the oil cap is tight also. The most important thing however is to check oil level and ensure it's within limits. You could upload a photo and post a link to it in a comment.
Deb W on May 21, 2016:
Great info - easier to read than the booklet that came with my mower. My question is this: mower is 2 years old. Honda. On the top of the mower, the red piece has oil forming on it. The dealer wants me to bring it in, and I suspect will charge me whether it's a big deal or not. Any thoughts?
Eugene Brennan (author) from Ireland on May 18, 2016:
Hi Amanda. Weedeater mowers have Briggs engines. If the fuel tank is below the carburetor, the system uses a diaphragm pump setup. If you can hear air, the chances are that the primer bulb is punctured, but have a good look at it in good lighting conditions to see if there are any cracks (likely to be around the perimeter where it flexes). You may be able to put your finger over the crack when priming, and see if that improves things. Here's a video on YouTube which shows how to replace a primer bulb: https://www.youtube.com/watch?v=VPGfMh1nPh8
Alternatively the diaphragm may be worn. A section of this pumps fuel into a small reservoir located at the the top of the tank, and the fuel then overflows back into the main tank when the reservoir is full. If the diaphragm isn't working properly, this won't happen. Try to re-prime the engine every time it stops running. Eventually if the diaphragm is working, the engine may suck up enough fuel for it to stay running. Anyway, here's another video for changing a diaphragm: https://www.youtube.com/watch?v=C5nzigcNTwo&fe...
Amanda on May 18, 2016:
Great article but I'm still puzzled. I can get my mower to run briefly when turning on it's side to prime. When pressing the primer bulb all that is heard is the air coming through. Once tilted on it's left side gas will begin to shoot small steam when bulb is mashed. Could I need a new diaphragm ? Or is there something that pulls fuel up that could be missing? Its a weed eater brand 158cc I would appreciate any feedback. Thanks
Eugene Brennan (author) from Ireland on May 17, 2016:
Hi Veronica! You are probably referring to the primer. Usually you push this about 5 to 10 times. Press it in fully and then release it slowly. Some carburetors have a float plunger which you hold down until the carburetor floods. Then the engine is started.
Veronica Smallwood on May 16, 2016:
What is the little. Push. Plunger thing to do before starting the mower to get the gas into the float
Eugene Brennan (author) from Ireland on February 09, 2015:
Thanks Tina for the comments! - It's always best the keep the carburetor high side up when tipping mower on its side so that it doesn't get choked with oil. Usually the breather vent is on this side, and that's where oil can leak from. If the cord is hard to pull, you could attempt to remove the upper cowling to see what's causing the problem. Usually there are only a few screws or bolts holding this on, so re-assembly wouldn't be such a big deal and it mightn't end up like your bicycle all those years ago!
Tina Dubinsky from Brisbane, Australia on February 09, 2015:
Hi Eugbug - Thanks for such an informative article. I'm going to try a few of the suggested repairs on my mower which stopped dead a couple of weeks ago. The chord keeps choking (won't pull) and the small amount of leverage I've managed to get with the cord by manually turning the blades, has resulted in oil pumping out of the exhaust. I believe that the oil was caused because I tipped it on its side trying to clear wet grass from beneath (still didn't fix the cord properly) and this meant oil leaked out to where its not meant to go. My father used to tip his mower on the side al the time when I was growing up and I'd watch him work on the mower too (sometimes help) but I don't recall leaking oil /fuel being a problem. I'm hoping since its been three weeks that the leaking oil shouldn't be a problem any more. I'm a bit worried though about pulling my mower apart, that I'm going to end up with it unassembled and no idea how to put it back to together. Same thing happened to my bicycle twenty years ago.... Very useful article, thanks.
bgh222@aol.com on May 22, 2014:
This post did not address my problem (how to troubleshoot a fuel pump and fuel shut off solenoid, Kohler Courage). However I did read it over and found it to be very well written and informative. If someone has a problem following these instructions, I would suggest they call a friend or take your mower to a shop.
Eugene Brennan (author) from Ireland on May 03, 2013:
Hi Dwayne, thanks for the comments! - I shall add your suggestion to the article!
Dwayne Smith from Tallapoosa, GA. on May 03, 2013:
Nice article. However, you did leave out one of the three major requirements for an engine to run; compression. Often on lawnmowers, a tight valve or loose spark plug can be a simple fix. Voted up.
Posted by: susanbirsted.blogspot.com
Source: https://dengarden.com/landscaping/Why-Wont-That-Lawnmower-Start

 https://www.effectivegatetocontent.com/z5cpvav4?key=2042a83f2a3119c646413102b4fc8a94
Posting Komentar untuk "gas coming out of spark plug hole on lawn mower"